Crispy Baked Zucchini Chips – Easy Healthy Snack
Crispy Baked Zucchini Chips are about to become your new obsession. Forget those greasy, store-bought snacks; we’re talking about a healthier, tastier alternative that you can whip up right in your own oven. Have you ever found yourself staring at a surplus of zucchini and wondering what to do with it all? Well, wonder no more! These delightful bites are the perfect solution. What makes these Crispy Baked Zucchini Chips so incredibly special? It’s the magical transformation of a humble vegetable into a crunchy, satisfying treat that’s both light and flavorful. They’re ridiculously easy to make, require minimal ingredients, and deliver an addictive crunch that will have you reaching for more. Whether you’re looking for a guilt-free appetizer, a fun side dish, or just a delicious way to sneak in some extra veggies, these Crispy Baked Zucchini Chips are the answer you’ve been searching for.
Crispy Baked Zucchini Chips
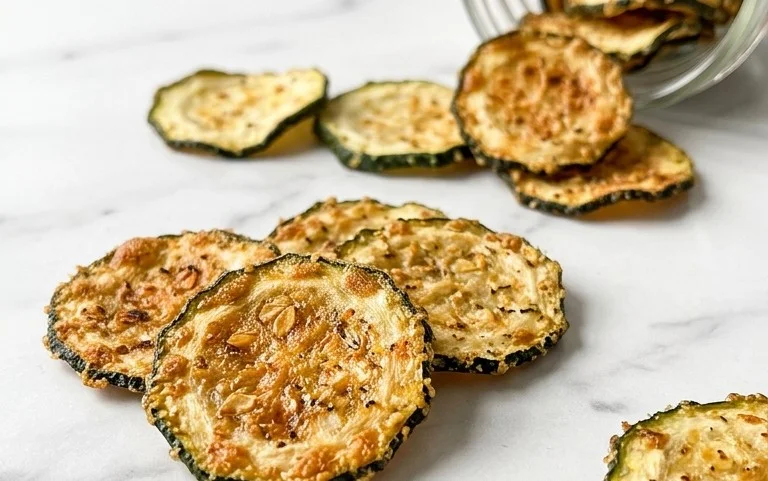
Looking for a healthy and delicious way to enjoy zucchini? Forget the fried versions and say hello to these incredibly crispy baked zucchini chips! They’re surprisingly easy to make, packed with flavor, and a fantastic appetizer or snack that even the pickiest eaters will love. We’re talking about golden brown, perfectly seasoned bites that have just the right amount of crunch. They’re so good, you might just find yourself making them a regular feature in your kitchen.
Ingredients:
Preparation: Slicing and Salting Your Zucchini
The secret to truly crispy zucchini chips lies in removing as much moisture as possible. This first step is crucial. Start by washing your zucchini thoroughly. Then, using a sharp knife or a mandoline slicer (if you have one, this will ensure perfectly even slices, which is key for uniform cooking), slice the zucchini into rounds about 1/8 inch thick. Aim for consistency – if some slices are much thicker than others, they won’t cook evenly. Once sliced, lay the zucchini rounds out on a clean kitchen towel or paper towels. Sprinkle them generously with a little bit of extra salt (beyond the amount in the recipe) on both sides. Let them sit for about 15-20 minutes. You’ll notice that water starts to bead up on the surface of the zucchini. This is exactly what we want! After the waiting period, gently pat the zucchini slices dry with more paper towels to absorb all the released moisture. This step is non-negotiable for achieving that coveted crispiness. Skipping this will result in soggy chips, and nobody wants those!
Coating for Maximum Flavor and Crunch
Now for the delicious part – creating the flavorful coating that will transform our humble zucchini into crispy chips. In a shallow bowl or a plate, combine the panko breadcrum extractbs, grated Parmesan cheese, and the 1/4 teaspoon of salt. Panko breadcrum extractbs are essential here because their larger, airier texture creates a superior crisp compared to regular breadcrum extractbs. The Parmesan cheese adds a wonderful savory, nutty flavor that complements the zucchini perfectly. Whisk these ingredients together until they are well combined.
In a separate bowl, pour the olive oil. This will act as our “glue” to help the breadcrum extractb mixture adhere to the zucchini slices. Drizzle the olive oil over the zucchini slices and gently toss them with your hands or a spatula to ensure each slice is lightly coated. Don’t drench them; just a light, even coating is needed.
Now, take one oiled zucchini slice at a time and place it into the breadcrum extractb and Parmesan mixture. Press gently on both sides to ensure a good coating. You want a nice, even layer of the breadcrum extractbs and cheese clingin extractg to the zucchini. Place the coated zucchini slices in a single layer on a baking sheet that has been lined with parchment paper. Parchment paper is a lifesaver here, preventing sticking and making cleanup a breeze. Make sure the slices are not overlapping, as this will steam them instead of allowing them to crisp up. If your baking sheet is too crowded, it’s better to use two sheets or bake in batches.
Baking to Golden Perfection
Preheat your oven to a fairly high temperature, around 400°F (200°C). This high heat is key to achieving that crispy texture quickly before the zucchini gets mushy. Once your oven is preheated and your baking sheets are filled with beautifully coated zucchini slices, carefully place them into the oven.
Bake for about 10-15 minutes. During this time, keep a close eye on them. You’ll want to flip them about halfway through the baking time to ensure even browning and crisping on both sides. Use a thin spatula or tongs to carefully turn each chip over. Continue baking for another 5-7 minutes, or until the edges are golden brown and crispy. The exact baking time will depend on your oven and how thin your zucchini slices are. Some might be perfectly crisp in 10 minutes, while others might need closer to 20. The goal is a delightful golden hue and a noticeable crispness when you gently tap a chip.
Serving and Enjoying
Once your zucchini chips are perfectly golden and crispy, remove them from the oven. Let them cool on the baking sheet for a minute or two – they will continue to crisp up as they cool. These are best enjoyed warm, right out of the oven. Serve them immediately with a side of Greek yogurt ranch, or your favorite dipping sauce. They make a fantastic light appetizer, a side dish for sandwiches or burgers, or even a healthy snack to curb those afternoon cravings. If you happen to have any leftovers (which is unlikely!), you can store them in an airtight container at room temperature for a day or two, but they will lose some of their crispiness. For the best experience, make them fresh and devour them!

Conclusion:
I hope you’ve enjoyed learning how to make these incredibly satisfying crispy baked zucchini chips! This recipe is a true winner because it transforms a humble vegetable into a delightful, guilt-free snack. They are remarkably easy to prepare, require minimal ingredients, and deliver a fantastic crunch that will have you reaching for more. They’re the perfect healthier alternative to traditional potato chips, making them an excellent choice for movie nights, appetizer platters, or even just a midday craving. Don’t hesitate to give these crispy baked zucchini chips a try – you won’t be disappointed!
These versatile chips are fantastic on their own, but they also shine when served with your favorite dips. A creamy ranch, zesty marinara, or a spicy aioli are all wonderful companions. For a more substantial meal, consider crum extractbling them over a fresh salad for added texture and flavor, or using them as a creative topping for homemade pizzas.
If you’re looking to switch things up, feel free to experiment with different seasonings! Smoked paprika adds a lovely depth, garlic powder and onion powder create a classic flavor profile, and a pinch of chili flakes can offer a gentle kick. You can even try a sprinkle of nutritional yeast for a cheesy, umami flavor.
Frequently Asked Questions:
How do I ensure my zucchini chips are truly crispy?
The key to crispy baked zucchini chips lies in thin slicing and removing excess moisture. Using a mandoline slicer ensures uniform thickness, which helps them bake evenly. After slicing, lay the zucchini on paper towels and gently press to absorb as much water as possible before seasoning and baking. Don’t overcrowd the baking sheet; give them space to allow air to circulate.
Can I make these ahead of time?
While they are best enjoyed fresh for maximum crispness, you can prepare them a few hours in advance. Store cooled chips in an airtight container at room temperature. If they lose a bit of their crispness, you can briefly reheat them in a single layer on a baking sheet in a low oven (around 250°F or 120°C) for a few minutes.
What if I don’t have a mandoline slicer?
No problem! You can carefully slice the zucchini with a very sharp knife. Aim for slices that are as thin and uniform as possible. It might take a little more patience, but the result will be just as delicious!
Crispy Baked Zucchini Chips
Enjoy a healthy and delicious snack with these crispy baked zucchini chips, a fantastic alternative to fried snacks.
Ingredients
-
2 medium zucchini (sliced into 1/8″ rounds)
-
1.5 tablespoons olive oil
-
1/3 cup panko breadcrumbs
-
1/3 cup grated parmesan cheese
-
1/4 teaspoon salt
-
Greek yogurt ranch (for dipping (optional))
Instructions
-
Step 1
Preheat your oven to 400°F (200°C). Line a baking sheet with parchment paper. -
Step 2
In a large bowl, toss the zucchini slices with olive oil until lightly coated. -
Step 3
In a separate shallow dish, combine the panko breadcrumbs, grated Parmesan cheese, and salt. -
Step 4
Dip each zucchini slice into the breadcrumb mixture, ensuring both sides are well coated. -
Step 5
Arrange the coated zucchini slices in a single layer on the prepared baking sheet. -
Step 6
Bake for 15-20 minutes, flipping halfway through, until golden brown and crispy. Watch carefully to prevent burning. -
Step 7
Serve immediately with Greek yogurt ranch for dipping, if desired.
Important Information
Nutrition Facts (Per Serving)
It is important to consider this information as approximate and not to use it as definitive health advice.
Allergy Information
Please check ingredients for potential allergens and consult a health professional if in doubt.