Garlic Butter Keto Bread Recipe-Easy & Delicious
Garlic Butter Keto Bread is the answer to your carb cravings, and I’m so excited to share this recipe with you. Have you been missing that satisfying chew and delightful aroma of freshly baked bread since starting your ketogenic journey? I certainly have, and that’s precisely why I set out to create a bread that not only fits perfectly into a low-carb lifestyle but also delivers an explosion of flavor that will have you licking your fingers. This isn’t just any keto bread; it’s a celebration of rich, savory goodness. The magic lies in the perfect balance of creamy butter, pungent garlic, and a texture that’s surprisingly close to the real deal. It’s wonderfully versatile, perfect for dipping in your favorite soups, serving alongside a hearty meal, or simply enjoying on its own as a delicious treat. Prepare to fall in love with Garlic Butter Keto Bread all over again!
Garlic Butter Keto Bread
There’s something incredibly satisfying about warm, fresh bread. For many of us embracing a ketogenic lifestyle, this is one of the biggest cravings we have to contend with. But what if I told you that you can enjoy the comforting taste and texture of delicious, crusty bread without derailing your macros? This Garlic Butter Keto Bread is my answer to that very question. It’s surprisingly simple to make, uses ingredients you might already have in your pantry, and the aroma that fills your kitchen as it bakes is simply divine. It’s perfect for slathering with butter, dipping into soups, or even making the most amazing keto grilled cheese. Get ready to fall in love with keto bread all over again!
Ingredients:
Preparation and Mixing
Let’s get started on this delightful keto bread! The first step is to preheat your oven. I like to set mine to 350°F (175°C). While the oven is heating up, prepare your baking vessel. I find that a standard loaf pan works perfectly, but you can also use a smaller round cake pan if you prefer a more rustic loaf. Line your chosen pan with parchment paper, ensuring there’s a slight overhang on the sides. This will make it incredibly easy to lift the bread out once it’s baked.
Now, in a large mixing bowl, we’re going to combine the wet ingredients. Crack your four large eggs into the bowl. Add the half cup of melted unsalted butter. Don’t worry if it’s still a little warm, just make sure it’s not piping hot. Next, pour in the tablespoon of apple cider vinegar. The apple cider vinegar plays a crucial role here; it reacts with the baking powder to help our bread rise and achieve a lighter texture, which is often a challenge with keto baking. Whisk these ingredients together until they are well combined and the mixture is smooth.
Next, it’s time for the dry ingredients. To the same bowl, add your 1 1/2 cups of blanched almond flour. This is the foundation of our low-carb bread. Make sure you’re using blanched almond flour, as the skins can affect the texture. Following that, add the 1/2 cup of psyllium husk powder. It’s really important to use psyllium husk powder, not the whole husks, as the powder is what gives the bread its bread-like structure and chegrape juicess. If you use whole husks, your bread might turn out too gummy. Then, add your 2 teaspoons of baking powder and 1 teaspoon of salt. Whisk these dry ingredients together gently to distribute them evenly throughout the almond flour mixture.
Once your wet and dry ingredients are prepped, it’s time to combine them. Gradually add the dry ingredients to the wet ingredients in the mixing bowl. You can do this in a couple of additions, mixing as you go. Use a spatula or a wooden spoon to combine everything. You’ll notice the dough will start to thicken quite a bit as the psyllium husk absorbs the moisture. Keep mixing until there are no dry pockets of almond flour remaining and you have a cohesive dough. It will be a thick dough, almost like a very stiff muffin batter, and that’s exactly what we’re looking for.
The final touch before baking is to incorporate that wonderful garlic flavor. Add your 4 cloves of minced garlic to the dough. Stir it in thoroughly until it’s evenly distributed throughout the mixture. The scent of the raw garlic mingling with the almond flour and butter is already a preview of the deliciousness to come.
Baking the Garlic Butter Keto Bread
Now that your dough is ready and fragrant, it’s time to get it into the pan. Spoon the dough into your prepared loaf pan. Use your spatula to spread it out evenly, trying to get the top as smooth as possible. Because keto doughs don’t rise as much as traditional doughs, what you put in the pan is pretty much what you’ll get out.
Pop the pan into your preheated oven. We’ll bake this bread for about 45-55 minutes. The exact baking time can vary depending on your oven, so it’s important to keep an eye on it. You’ll know it’s ready when the top is golden brown and a toothpick or a skewer inserted into the center comes out clean. If the top is browning too quickly and the inside isn’t quite done, you can always loosely tent it with aluminum foil for the last 15-20 minutes of baking.
Once it’s baked to perfection, carefully remove the loaf pan from the oven. Let the bread cool in the pan for about 10-15 minutes. This allows it to set up properly and prevents it from falling apart when you try to remove it. After the initial cooling period, use the parchment paper overhang to lift the loaf out of the pan and place it on a wire rack to cool completely. This is crucial for achieving that perfect crust. Letting it cool completely ensures the inside is firm and not at all gummy.
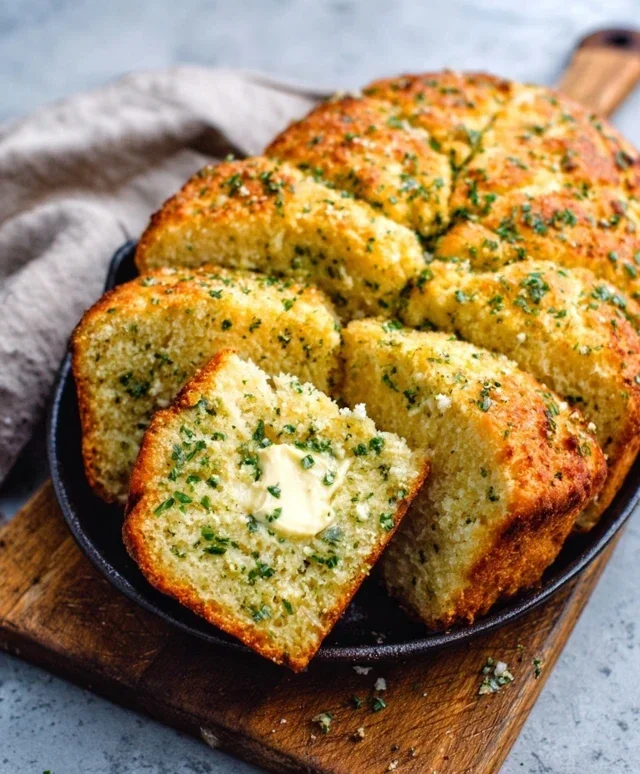
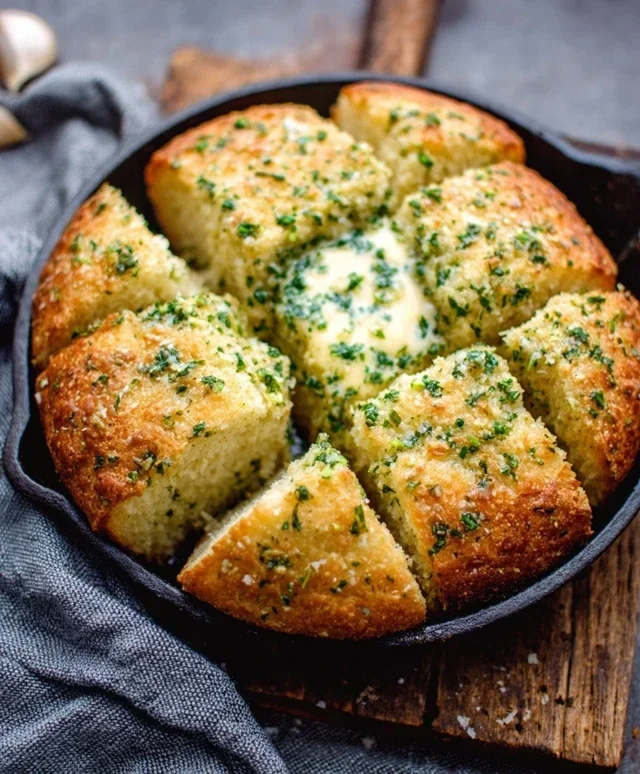
While the bread is still warm, but after it has cooled a bit from the oven, this is the perfect time to add an extra layer of garlic butter goodness. Melt a little extra butter (about 2-3 tablespoons) and add a pinch of minced garlic or garlic powder to it. Brush this glorious mixture generously over the top of the warm loaf. The heat will help the garlic butter soak into the crust, infusing it with even more incredible flavor.
Once completely cooled, slice your Garlic Butter Keto Bread with a sharp serrated knife. The texture should be soft and slightly chewy on the inside with a lovely, crisp crust. Enjoy it toasted or at room temperature, and savor every delicious keto-friendly bite!
Conclusion:
I hope you’re as excited as I am to bake this delicious Garlic Butter Keto Bread! This recipe truly delivers on flavor and texture, offering a satisfyingly soft interior with a delightful crust, all while keeping carbs remarkably low. It’s the perfect guilt-free indulgence for anyone following a ketogenic lifestyle, or simply looking for a healthier bread alternative. The fragrant garlic and rich butter create an irresistible aroma as it bakes, making your kitchen smell amazing. Whether you’re craving a side for your favorite keto meal, a base for avocado toast, or just a satisfying snack, this bread is a game-changer.
Get creative with your serving! This versatile Garlic Butter Keto Bread is fantastic on its own, toasted with a smear of extra butter, or served alongside hearty stews and chilis. For variations, consider adding a sprinkle of dried herbs like rosemary or thyme to the dough for an extra layer of complexity, or even a touch of finely grated Parmesan cheese for a savory twist. Don’t hesitate to experiment and find your perfect flavor combination!
I truly encourage you to give this recipe a try. It’s simpler than you might think and the rewards are immense. You’ll be amazed at how well it satisfies those bread cravings. Happy baking!
Frequently Asked Questions:
How can I store this keto bread?
Once cooled, you can store your Garlic Butter Keto Bread in an airtight container at room temperature for up to 3 days, or in the refrigerator for up to a week. For longer storage, it freezes beautifully! Slice it before freezing for easy toasting.
Can I make this bread dairy-free?
Yes, you can! Substitute the butter with a high-quality dairy-free butter alternative. Ensure it’s one that solidifies at room temperature and has a good fat content for optimal results.
What flours can I use if I don’t have almond flour?
While almond flour is key for the texture of this specific Garlic Butter Keto Bread recipe, if you need an alternative, you could try a blend of coconut flour and psyllium husk powder, but be aware that the ratios and baking time may need to be adjusted significantly. Other nut flours like pecan or macadamia can also be explored, though they might alter the flavor profile.
Garlic Butter Keto Bread
A delicious and easy keto-friendly bread recipe infused with garlic and butter, perfect for a low-carb diet.
Ingredients
-
1 cup almond flour
-
1/4 cup psyllium husk
-
2 tsp baking powder
-
1/2 tsp salt
-
1/2 cup unsalted butter, melted
-
3 large eggs
-
1/4 cup water
-
2 tbsp minced garlic
-
2 tbsp chopped fresh parsley
Instructions
-
Step 1
Preheat your oven to 350°F (175°C) and grease a loaf pan. -
Step 2
In a large bowl, whisk together the almond flour, psyllium husk, baking powder, and salt. -
Step 3
In a separate bowl, whisk together the melted butter, eggs, and water until well combined. -
Step 4
Pour the wet ingredients into the dry ingredients and mix until a dough forms. Stir in the minced garlic and chopped parsley. -
Step 5
Transfer the dough to the prepared loaf pan and spread evenly. -
Step 6
Bake for 30 minutes, or until the bread is golden brown and cooked through. Let cool in the pan for 10 minutes before transferring to a wire rack to cool completely.
Important Information
Nutrition Facts (Per Serving)
It is important to consider this information as approximate and not to use it as definitive health advice.
Allergy Information
Please check ingredients for potential allergens and consult a health professional if in doubt.