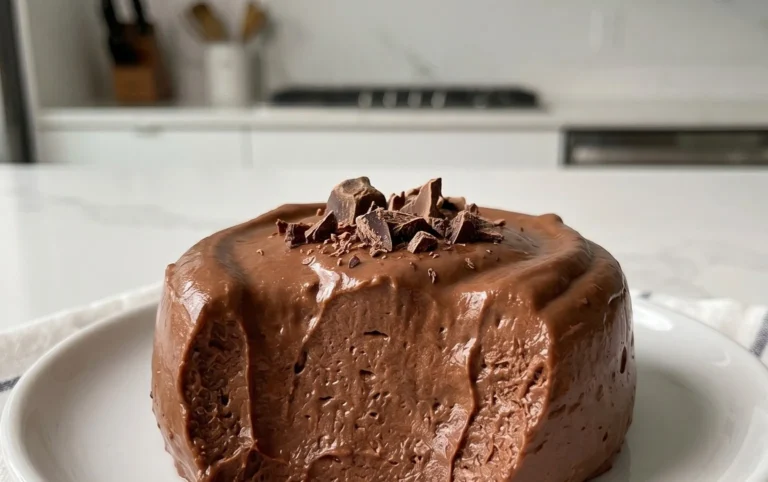
Chocolate Chip Cookie Dough Brownie Bombs Recipe
Chocolate Chip Cookie Dough Brownie Bombs are not just a dessert; they’re an experience. If you’re anything like me, you’ve probably stood at the grocery store, torn between the creamy, comforting allure of cookie dough and the rich, decadent depth of a brownie. Well, prepare to have your mind – and your taste buds – blown. We’ve taken the best of both worlds and fused them into one utterly irresistible treat. Imagin extracte biting into a fudgy brownie shell, only to discover a molten core of irresistible, edible cookie dough. It’s the ultimate indulgence, a symphony of textures and flavors that will have you swooning. This is more than just a recipe; it’s a love letter to two iconic desserts, elevated into something truly magical. Get ready to make your dessert dreams a delicious reality with these Chocolate Chip Cookie Dough Brownie Bombs.
Ingredients:
Chocolate Chip Cookie Dough Brownie Bombs: A Decadent Delight
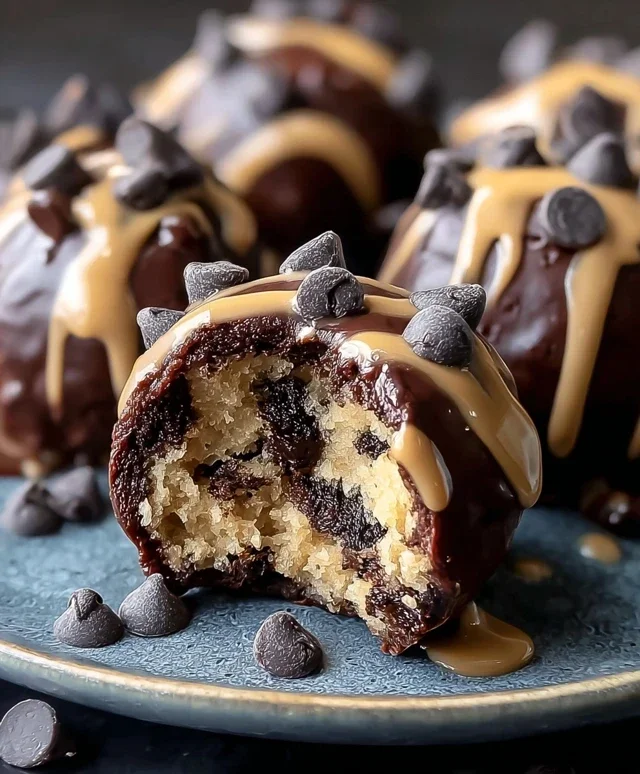
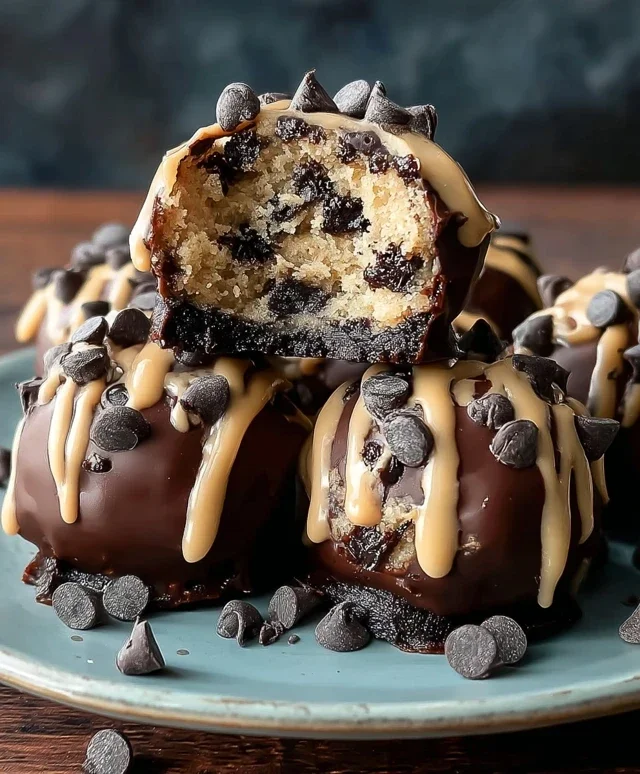
Get ready to embark on a culinary adventure that marries two of the most beloved dessert classics: brownies and chocolate chip cookie dough. We’re not just talking about a simple swirl; we’re creating something truly extraordinary – Chocolate Chip Cookie Dough Brownie Bombs! These little spheres of pure joy are the ultimate indulgence, a perfect bite packed with rich, fudgy brownie and creamy, delightful cookie dough, all enrobed in a smooth chocolate shell. They’re impressive enough for a special occasion but surprisingly easy to make, making them perfect for a weekend treat or to impress your friends and family.
The magic of these bombs lies in their layered textures and concentrated flavors. We start with a foundation of deeply satisfying brownie, then add a luscious, no-bake cookie dough center, and finally, seal it all with a crisp chocolate coating. It’s a multi-sensory experience that will have everyone beggin extractg for the recipe. Let’s dive in and create these irresistible treats!
Phase 1: Preparing the Brownie Base
The first step is to prepare our brownie base. Follow the instructions on your chosen brownie mix box meticulously. This usually involves combining the mix with eggs, oil, and water. Once your batter is mixed, spread it evenly into a baking pan, typically an 8×8 or 9×13 inch pan depending on the box instructions and how thick you want your brownie layer. Bake according to the package directions until a toothpick inserted into the center comes out with moist crum extractbs attached. It’s crucial not to overbake here, as we want a fudgy, dense brownie.
Once baked, allow the brownies to cool completely. This is a critical step! Trying to work with warm brownies will result in a sticky, unmanageable mess. You can speed up the cooling process by placing the pan in the refrigerator for about 30 minutes once they’ve cooled slightly at room temperature.
Phase 2: Crafting the Irresistible Cookie Dough Center
Now for the star of our show: the no-bake chocolate chip cookie dough! In a medium bowl, cream together the softened unsalted butter, packed brown sugar, and granulated sugar until light and fluffy. This step incorporates air, making the cookie dough tender. You can use an electric mixer for this, or a good old-fashioned whisk and some elbow grease.
Next, beat in the milk and vanilla extract until well combined. The milk will help to emulsify the mixture and create a smooth consistency. Gradually add the all-purpose flour, mixing until just combined. Be careful not to overmix the flour, as this can develop gluten and make the cookie dough tough. We want that tender, melt-in-your-mouth texture. Finally, fold in the mini chocolate chips. These little bursts of chocolate are essential for that classic cookie dough experience. The resulting dough should be thick and scoopable, similar to traditional cookie dough but without raw eggs.
Phase 3: Assembling the Brownie Bombs
Once your brownies are completely cooled, it’s time to assemble our bombs. Crum extractble the cooled brownies into a large bowl. You want fine crum extractbs, so a food processor can be a helpful tool here if you have one, but crum extractbling by hand works perfectly fine too. Add about half of the prepared cookie dough mixture to the brownie crum extractbs.
Now, using your hands, mix the brownie crum extractbs and cookie dough together until they are well combined and the mixture holds together when squeezed. This will create a slightly sticky, dough-like consistency that you can easily roll into balls. If the mixture seems too dry and crum extractbly, add a tablespoon of milk at a time until it reaches the desired consistency. If it seems too wet, add a few more brownie crum extractbs.
Roll the mixture into 1-inch balls. You can use a cookie scoop for uniform size or simply roll them by hand. Place these brownie-cookie dough balls onto a parchment-lined baking sheet. You should get a generous number of these delightful bombs from one batch.
Phase 4: The Chocolatey Embrace
This is where our creations transform into true “bombs.” Place the melted chocolate candy melts in a microwave-safe bowl. Microwave in 30-second intervals, stirring well after each interval, until smooth and fully melted. Be careful not to overheat them, as they can seize up. You want a smooth, fluid chocolate for dipping.
Using a fork or a dipping tool, carefully dip each brownie-cookie dough ball into the melted chocolate, ensuring it is fully coated. Let any excess chocolate drip back into the bowl. Place the coated bombs back onto the parchment-lined baking sheet. If you’re feeling fancy, and I highly recommend you do, you can drizzle a little extra melted chocolate over the tops of the bombs before the coating sets.
Phase 5: The Finishing Touches and Chill Time
While the chocolate is still wet, this is your chance to add those optional sprinkles! Go wild with colors and shapes to make your Chocolate Chip Cookie Dough Brownie Bombs truly spectacular.
Once all the bombs are dipped and decorated, place the baking sheet into the refrigerator for at least 30 minutes, or until the chocolate coating is completely set and firm. This chilling time is essential to allow the flavors to meld and the textures to firm up, making them easy to handle and enjoy.
Once chilled, your Chocolate Chip Cookie Dough Brownie Bombs are ready to be devoured! Store them in an airtight container in the refrigerator for up to a week, though I doubt they’ll last that long. Enjoy every rich, fudgy, and doughy bite!
Conclusion:
And there you have it – your ultimate guide to creating these incredible Chocolate Chip Cookie Dough Brownie Bombs! These delightful treats are a true showstopper, perfectly marrying the fudgy richness of brownies with the irresistible chegrape juicess of cookie dough. They’re surprisingly simple to make, yet they deliver an explosion of flavor and texture that’s guaranteed to impress everyone. Whether you’re a seasoned baker or just starting out, I truly encourage you to give these a try. They are the perfect addition to any dessert table, potluck, or simply a well-deserved indulgence for yourself.
For serving, I love these best slightly warm, allowing the chocolate chips to be delightfully melty. They’re also fantastic at room temperature. Consider dusting them with a little powdered sugar for an extra touch of elegance, or serving them alongside a scoop of vanilla bean ice cream for the ultimate decadent experience. If you’re feeling adventurous with variations, try adding a swirl of caramel sauce into the brownie batter before baking, or incorporate chopped nuts like pecans or walnuts for added crunch. You could even experiment with different types of chocolate chips, like dark or white chocolate, to tailor the flavor profile.
Frequently Asked Questions:
Can I make these Chocolate Chip Cookie Dough Brownie Bombs ahead of time?
Absolutely! These brownie bombs can be made a day or two in advance and stored in an airtight container at room temperature. They’re often even better the next day as the flavors meld together. For longer storage, you can refrigerate them, but allow them to come to room temperature before serving for the best texture.
What’s the best way to store leftover brownie bombs?
To keep your Chocolate Chip Cookie Dough Brownie Bombs fresh and delicious, store them in an airtight container at room temperature for up to 3 days. If your kitchen is particularly warm, or if you plan to store them for longer than 3 days, refrigeration is a good option, but remember to let them sit out for a bit before indulgin extractg!
Can I freeze these brownie bombs?
Yes, freezing is a great option! Wrap each brownie bomb individually in plastic wrap, then place them in a freezer-safe bag or container. They can be frozen for up to 2-3 months. Thaw them overnight in the refrigerator and then bring them to room temperature before enjoying.
Chocolate Chip Cookie Dough Brownie Bombs
Indulgent bombs combining rich brownie with no-bake cookie dough and a chocolate shell.
Ingredients
-
1 box of brownie mix, prepared according to package instructions
-
½ cup unsalted butter, softened
-
½ cup brown sugar
-
¼ cup granulated sugar
-
2 tablespoons milk
-
1 teaspoon vanilla extract
-
1¼ cups all-purpose flour
-
1 cup mini chocolate chips
-
2 cups chocolate candy melts, melted
-
Sprinkles (optional)
Instructions
-
Step 1
Prepare brownie mix according to package directions and let cool completely. Once cooled, crumble into small pieces. -
Step 2
In a medium bowl, cream together softened butter, brown sugar, and granulated sugar until light and fluffy. -
Step 3
Beat in milk and vanilla extract until well combined. -
Step 4
Gradually add flour and mix until just combined. Stir in mini chocolate chips. -
Step 5
Form the cookie dough into small balls, approximately 1 inch in diameter. -
Step 6
Take a small amount of crumbled brownie and flatten it in your palm. Place a cookie dough ball in the center and wrap the brownie around it, forming a ball. Ensure it is completely enclosed. -
Step 7
Repeat with remaining brownie and cookie dough. Chill the brownie bombs for at least 30 minutes. -
Step 8
Dip each brownie bomb into melted chocolate candy melts, ensuring it’s fully coated. Place on parchment paper. -
Step 9
Immediately sprinkle with sprinkles, if desired, before the chocolate sets. -
Step 10
Allow chocolate to set completely before serving.
Important Information
Nutrition Facts (Per Serving)
It is important to consider this information as approximate and not to use it as definitive health advice.
Allergy Information
Please check ingredients for potential allergens and consult a health professional if in doubt.