Chocolate Fruit Cones-Decadent Sweet Treat
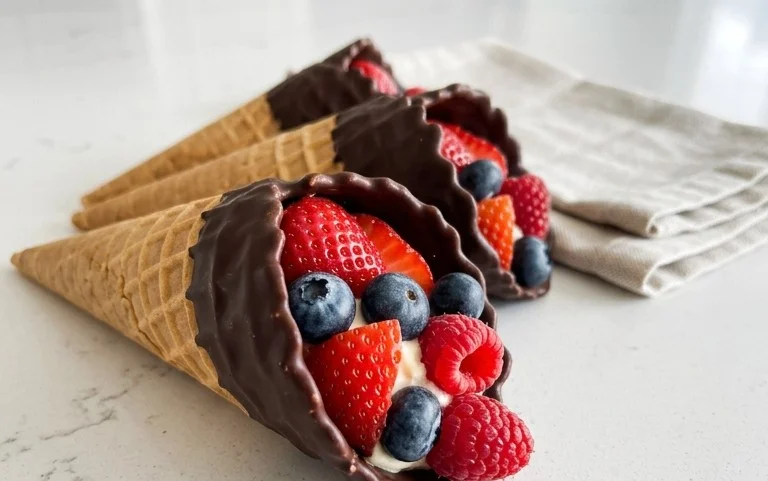
Chocolate Dipped Fruit Filled Cones are more than just a dessert; they’re a delightful journey for your taste buds and a whimsical treat that instantly sparks joy. Imagin extracte the satisfying crunch of a crisp waffle cone, giving way to a burst of luscious, fresh fruit, all lovingly enveloped in a rich, decadent chocolate shell. It’s this perfect harmony of textures and flavors – the sweet tang of the fruit against the smooth bitterness of the chocolate – that makes these Chocolate Dipped Fruit Filled Cones utterly irresistible. We all crave that little moment of indulgence, that perfect bite that transports us to a happier place, and these cones deliver exactly that. They’re remarkably simple to create, yet they boast a sophisticated presentation that will impress your guests or simply make your own afternoon snack feel like a special occasion. Get ready to discover how easy it is to bring this magical creation into your kitchen and share the delight of Chocolate Dipped Fruit Filled Cones with everyone you love.
Chocolate Dipped Fruit Filled Cones
There’s something truly magical about a chocolate-dipped treat, isn’t there? And when you combine that with the fresh burst of fruit and the satisfying crunch of a cone, you’ve got a dessert that’s pure joy. Today, we’re going to dive into making these delightful Chocolate Dipped Fruit Filled Cones. They’re surprisingly simple to assemble, making them perfect for a fun afternoon project or even a special occasion. Imagin extracte the delight on your guests’ faces, or the sheer happiness of treating yourself to something truly decadent. We’ll be using some wonderful, fresh ingredients to create a symphony of flavors and textures.
Ingredients:
Equipment You’ll Need:
Let’s Get Cooking!
Now for the fun part – bringin extractg these delicious cones to life! The process is all about careful preparation and a little bit of gentle handling.
Step 1: Preparing Your Workspace and Fruit
First things first, let’s get our fruit ready. If you’re using strawberries, give them a good wash and gently pat them dry with a paper towel. It’s crucial that the fruit is dry to prevent any unwanted moisture from affecting our chocolate. For larger strawberries, you might want to halve or quarter them so they fit nicely inside the cone without overcrowding. If you’re using softer fruits like bananas, chop them into small, bite-sized pieces. For mangoes or kiwis, aim for cubes that are roughly the same size as your berries. Set all your prepared fruit aside. Next, prepare your workspace for dipping. Line a baking sheet with parchment paper. This is your non-stick foundation for our soon-to-be-chocolate-covered creations. Having this ready in advance means you can move quickly once the chocolate is melted.
Step 2: Melting the Chocolate
This is where the magic really begin extracts! We need to melt our semisweet chocolate chips with a touch of coconut oil. The coconut oil helps to create a smoother, glossier chocolate coating that’s easier to work with and gives it a beautiful sheen. You have two main options here: microwave or double boiler. For the microwave method, place the chocolate chips and coconut oil in a microwave-safe bowl. Heat on 50% power for 30-second intervals, stirring well after each interval. Be patient! It’s easy to scorch chocolate, so it’s better to melt it slowly. Once it’s mostly melted, stir until it’s completely smooth. If you prefer a double boiler, fill a saucepan with about an inch of water and bring it to a simmer. Place a heatproof bowl on top of the saucepan, ensuring the bottom of the bowl doesn’t touch the water. Add the chocolate chips and coconut oil to the bowl and stir gently until the chocolate is melted and smooth. The goal is a luscious, pourable chocolate.
Step 3: Filling the Cones
With our chocolate perfectly melted and our fruit prepped, it’s time to start filling. Gently spoon your prepared fruit into the bottom of each sugar cone. Don’t overfill them! You want to leave enough space at the top for the chocolate coating to adhere properly. Aim to fill the cones about two-thirds of the way full. If you have a piping bag, you can use it to carefully place the fruit inside the cones, which can sometimes be a bit neater. However, a small spoon works perfectly well too. Ensure the fruit pieces are nestled together somewhat, creating a good base for the chocolate.
Step 4: Dipping in Chocolate
Now for the most satisfying part – dipping! Hold a fruit-filled cone by the tip and carefully dip the top opening into the melted chocolate. You can tilt the cone slightly to allow the chocolate to cascade down the sides a bit, creating those beautiful drips we all love. You can also use a spoon to gently spoon chocolate over the opening and down the sides. Aim to get a good coating that covers the fruit inside and creates a lovely seal. Don’t worry about perfection; a slightly rustic look is part of their charm! Once dipped, gently tap the cone against the side of the bowl to let any excess chocolate drip off. This helps to prevent thick, uneven coatings.
Step 5: Decorating and Setting
As soon as you’ve dipped each cone, this is your chance to add those extra special touches before the chocolate sets. If you’re using sprinkles, chopped nuts, or shredded coconut, sprinkle them over the still-wet chocolate immediately after dipping. This is where you can really get creative and make each cone a unique masterpiece! Once decorated, carefully place the dipped cones, chocolate-side up, onto the prepared parchment-lined baking sheet. If some chocolate dripped down the sides of the cone, that’s perfectly fine! You can try to prop them up slightly if needed, but usually, they stand well enough on their own. Let them sit at room temperature for about 15-20 minutes, or until the chocolate is firm to the touch. For a quicker set, you can pop the baking sheet into the refrigerator for about 10-15 minutes, but be mindful of condensation if you leave them in there for too long. Once set, your beautiful Chocolate Dipped Fruit Filled Cones are ready to be devoured! Enjoy the delightful contrast of the crisp cone, the sweet and slightly tart fruit filling, and the rich chocolate coating. They’re a perfect treat for any occasion, or just because!

Conclusion:
And there you have it! These Chocolate Dipped Fruit Filled Cones are a delightful treat, offering a perfect balance of crisp wafer, sweet fruit, and rich chocolate. They’re incredibly versatile, making them a fantastic choice for parties, a special dessert, or even just a personal indulgence. The simplicity of the recipe means you can whip them up with minimal fuss, and the customizable filling options ensure there’s a flavor combination to suit everyone’s palate. I truly encourage you to give this recipe a try; you’ll be amazed at how impressive these elegant cones look and taste, all while being so easy to create. They’re a guaranteed crowd-pleaser!
For serving, consider presenting them on a decorative platter alongside fresh berries or a dollop of whipped cream. They also make a beautiful addition to a dessert buffet or can be individually wrapped as charming party favors. Don’t be afraid to experiment with different fruits – think juicy strawberries, sweet raspberries, tart cherries, or even diced mango. For an added twist, try drizzling contrasting colored chocolate over the dipped cones or rolling them in chopped nuts or sprinkles before the chocolate sets.
Frequently Asked Questions:
Q: Can I make these chocolate dipped fruit filled cones ahead of time?
A: Yes, absolutely! You can prepare these cones up to 2 days in advance. Store them in an airtight container in a cool, dry place. If your kitchen is particularly warm, it’s best to store them in the refrigerator, but be aware that condensation can sometimes occur when removed. To minimize this, let them come to room temperature gradually.
Q: What’s the best way to store leftover chocolate?
A: Once melted and used, any leftover chocolate can often be re-melted. If it’s pure chocolate without any additions, store it in a clean, airtight container in a cool, dark place. If you added anything like oil or butter, it’s best to use it relatively soon. You can also pour leftover melted chocolate onto parchment paper to create chocolate bark, which is another delicious way to enjoy it.
Chocolate Dipped Fruit Filled Cones
Deliciously sweet and fruity cones dipped in chocolate, perfect for a special treat.
Ingredients
-
1 cup semi-sweet chocolate chips
-
1 tablespoon vegetable oil
-
1 cup mixed fresh berries (e.g., strawberries, blueberries, raspberries)
-
1/4 cup chopped nuts (optional)
-
4 waffle cones
-
1/4 cup whipped cream
Instructions
-
Step 1
Melt chocolate chips and vegetable oil in a microwave-safe bowl in 30-second intervals, stirring until smooth. -
Step 2
Wash and prepare the mixed fresh berries. If using strawberries, hull and slice them. -
Step 3
Spoon a small amount of whipped cream into the bottom of each waffle cone. -
Step 4
Fill the waffle cones with the prepared mixed fresh berries. -
Step 5
Dip the top half of each filled cone into the melted chocolate, ensuring it’s well coated. Let excess chocolate drip off. -
Step 6
Sprinkle with chopped nuts, if using, immediately after dipping. -
Step 7
Place the cones on parchment paper and refrigerate for at least 10 minutes, or until the chocolate is set.
Important Information
Nutrition Facts (Per Serving)
It is important to consider this information as approximate and not to use it as definitive health advice.
Allergy Information
Please check ingredients for potential allergens and consult a health professional if in doubt.