Easy Oreo Cake Balls-Decadent Treat Recipe
Oreo cake balls are an absolute game-changer when it comes to effortless yet impressive treats. If you’re anything like me, the mere mention of Oreos conjures up feelings of nostalgic delight. These little bites of heaven capture that beloved cookie crunch and creamy filling, transforming it into a perfectly portioned, decadent dessert. What makes Oreo cake balls so incredibly special? It’s their delightful duality – they are astonishingly simple to make, requiring minimal ingredients and no complex baking skills, yet they look and taste like something you’d find in a high-end bakery. They’re the ultimate crowd-pleaser, perfect for parties, bake snon-alcoholic ales, or simply indulgin extractg your sweet tooth. Prepare to be amazed by how quickly these little spheres of joy disappear!
Why You’ll Adore These Oreo Cake Balls
Get Ready for a Flavor Explosion!
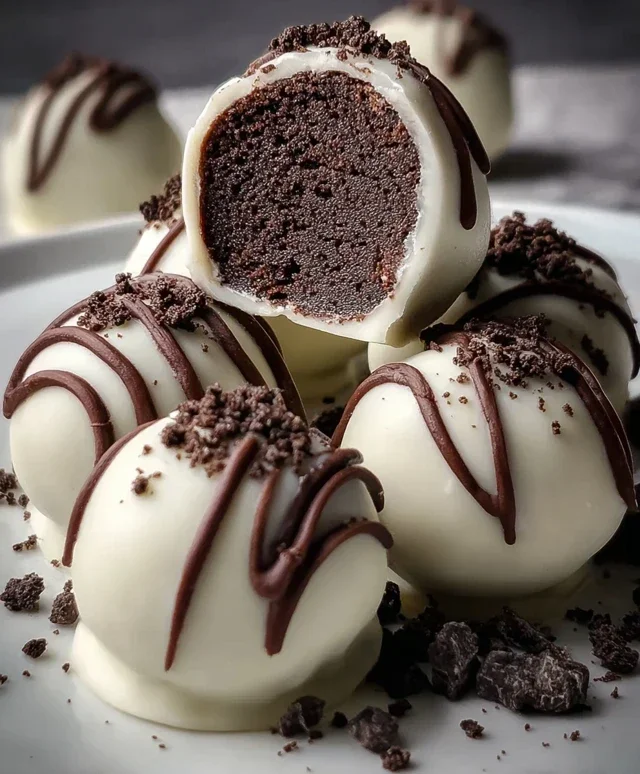
Decadent Oreo Cake Balls: A No-Bake Chocolate Lover’s Dream
Get ready to impress your friends, family, or just yourself with these utterly irresistible Oreo Cake Balls. These little bites of heaven are surprisingly simple to make, requiring no baking at all! They’re the perfect treat for parties, holidays, or any time you’re craving something rich, chocolatey, and undeniably delicious. Imagin extracte the classic crunch of an Oreo cookie combined with a creamy, decadent center, all enrobed in smooth, luscious white chocolate. Sounds amazing, right? Let’s dive into how you can create these delightful morsels in your own kitchen.
Ingredients:
Preparing Your Oreo Base
The foundation of our Oreo Cake Balls is a simple, yet incredibly effective mixture that brings together the familiar flavor of Oreos with a creamy binding agent. This part is crucial for achieving that perfect cake ball texture.
1. Crush the Oreos: The first step is to break down your Oreo cookies into fine crum extractbs. You can achieve this by placing the entire Oreo cookies (filling included, don’t discard it!) into a food processor and pulsing until you have a fine, sand-like consistency. If you don’t have a food processor, you can place the Oreos in a sturdy zip-top bag and crush them with a rolling pin until they are finely ground. The goal is to get rid of any large chunks, as this will ensure a smooth and cohesive mixture for your cake balls. Make sure to scrape down the sides of the food processor to get all the cookie goodness incorporated.
2. Mix with Cream Cheese: In a medium-sized mixing bowl, combine the finely crushed Oreo cookies with the softened cream cheese. Using a spatula or a wooden spoon, mix these two ingredients together thoroughly. You want to achieve a uniform consistency where the cream cheese is evenly distributed throughout the cookie crum extractbs. It should be moist enough to hold together when you squeeze it, resembling the texture of dough. If the mixture seems too dry and crum extractbly, you can add another tablespoon of cream cheese, but be careful not to make it too wet. The softened cream cheese is key here; if it’s too cold, it won’t mix well. Ensure it’s at room temperature for the best results. This mixture will be the “cake” part of your cake balls.
3. Form the Cake Balls: Once your Oreo and cream cheese mixture is well combined, it’s time to roll it into balls. I like to use a small cookie scoop or a tablespoon to portion out the mixture, aiming for balls that are about 1 inch in diameter. This size is perfect for a bite-sized treat. Roll each portion between your palms until it forms a smooth, compact ball. Place these formed balls onto a baking sheet lined with parchment paper or wax paper. Ensure the balls aren’t touching each other, as they will be chilled before dipping. This chilling step is very important to help them hold their shape when dipped in the melted chocolate.
Melting and Dipping
The next phase involves transforming your simple Oreo balls into elegant, chocolate-covered delights. This step requires a bit of care to ensure a smooth, beautiful coating.
4. Melt the White Candy Melts: In a microwave-safe bowl, place your white candy melts. Microwave them in 30-second intervals, stirring well after each interval. Continue this process until the candy melts are completely smooth and fluid. Be patient and avoid overheating, as this can cause the candy melts to seize or become grainy. If you find the candy melts are still a bit too thick to coat the balls smoothly, you can add the optional 2 tablespoons of heavy cream, stirring it in gradually until you reach your desired consistency. You can also use a double boiler method for a more controlled melt.
5. Dip the Oreo Balls: Now for the fun part – dipping! Carefully drop each Oreo ball into the melted white candy coating. Use a fork or a toothpick to gently turn the ball, ensuring it is completely coated on all sides. Once coated, carefully lift the ball out of the candy melt and let any excess chocolate drip back into the bowl. You can gently tap the fork on the side of the bowl to help remove excess coating. Place the dipped cake ball back onto the prepared parchment-lined baking sheet. If you are using toothpicks, insert one into each ball before dipping, then place the toothpick on the baking sheet. You can remove the toothpicks later.
Adding the Finishing Touches
The final steps transform your dipped cake balls into dazzling edible works of art. This is where you can get creative with your decorations!
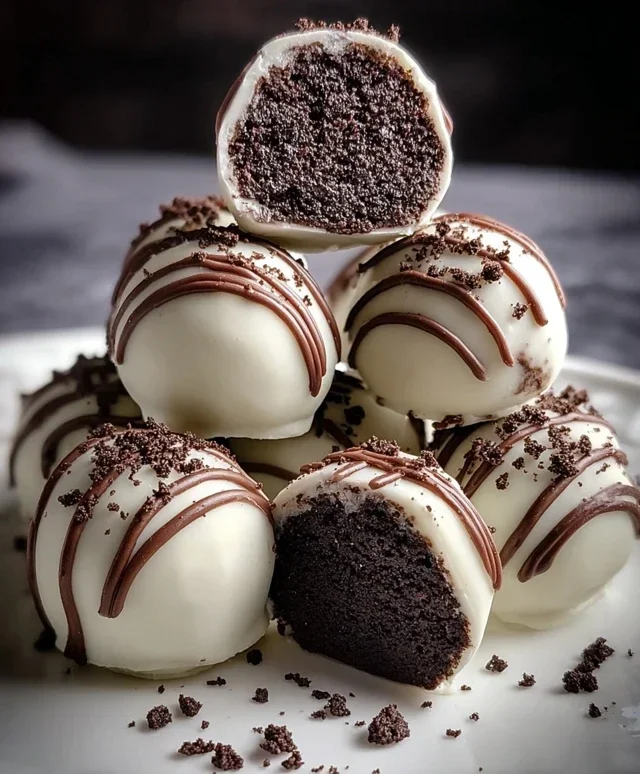
6. Decorate and Chill: While the white chocolate coating is still wet, sprinkle the tops of the Oreo cake balls with crushed Oreo cookie crum extractbs. This adds a beautiful contrast and an extra burst of Oreo flavor. For an even more decadent touch, melt your semi-sweet chocolate chips (using the same microwave method as the white candy melts). Once melted and smooth, drizzle the semi-sweet chocolate over the white chocolate-coated balls. You can use a fork or a piping bag for this. Once decorated, place the baking sheet in the refrigerator for about 15-20 minutes, or until the chocolate coating is completely set and firm. This chilling time is essential for them to firm up properly.
Once the chocolate is set, your Oreo Cake Balls are ready to be enjoyed! Store them in an airtight container in the refrigerator. These are truly a crowd-pleaser and a testament to how simple ingredients can create something so wonderfully delicious. Enjoy every bite!
Conclusion:
So there you have it – a simple yet utterly decadent way to transform your favorite Oreo cake balls into an irresistible treat! This recipe is fantastic because it’s incredibly forgiving, requires no baking (perfect for those hot summer days or when you’re short on time!), and delivers a punch of intense chocolatey, cookies-and-cream flavor in every bite. They’re perfect for birthdays, holidays, potlucks, or simply as a special indulgence for yourself.
I love serving these little gems alongside coffee or tea, or as a fun dessert after a casual dinner. For parties, they’re always a crowd-pleaser. Feeling adventurous? Don’t hesitate to experiment with variations! Try dipping them in white chocolate for a stark contrast, or swirl in some colored candy melts for a festive look. You could even add a tiny sprinkle of sea salt on top of the dark chocolate coating to enhance the sweetness. I truly encourage you to give this Oreo cake balls recipe a try; you won’t regret it!
Frequently Asked Questions:
Can I make these ahead of time?
Absolutely! Oreo cake balls are ideal for making ahead. Once they’ve set in the refrigerator, you can store them in an airtight container at room temperature for a few days, or in the refrigerator for up to a week. They actually tend to get even more delicious as the flavors meld together.
What’s the best way to store leftover Oreo cake balls?
For the best texture and freshness, store any leftover Oreo cake balls in a single layer in an airtight container. If you’ve dipped them in chocolate, keeping them in a slightly cooler environment, like a pantry or refrigerator, will help prevent the chocolate from melting.
Can I use different types of Oreos?
Yes, you can! While classic Oreos are the standard, feel free to get creative. Golden Oreos, mint Oreos, or even seasonal flavors can be used to create unique variations of your Oreo cake balls. Just be mindful that different flavors might affect the overall color and taste profile.
Oreo Cake Balls
Easy and delicious no-bake Oreo cake balls, perfect for parties and treats.
Ingredients
-
24 Oreo cookies (regular size)
-
4 oz cream cheese, softened
-
10 oz white candy melts
-
2 tablespoons heavy cream (optional, if needed to thin coating)
-
Crushed Oreo cookies for sprinkling
-
Semi-sweet chocolate chips for drizzling
Instructions
-
Step 1
Crush the Oreo cookies into fine crumbs using a food processor or by placing them in a zip-top bag and crushing with a rolling pin. Reserve about 1/4 cup of crushed Oreos for sprinkling. -
Step 2
In a medium bowl, combine the crushed Oreo cookies (minus the reserved portion) and softened cream cheese. Mix until well combined and a dough-like consistency forms. -
Step 3
Roll the mixture into small balls, about 1-inch in diameter. Place them on a baking sheet lined with parchment paper. -
Step 4
Melt the white candy melts according to package directions. If the coating is too thick, stir in the heavy cream, 1 tablespoon at a time, until desired consistency is reached. Ensure no water comes into contact with the candy melts. -
Step 5
Dip each Oreo ball into the melted candy coating, ensuring it’s fully covered. Allow excess coating to drip off. Place back on the parchment-lined baking sheet. -
Step 6
While the coating is still wet, sprinkle the tops with the reserved crushed Oreo cookies. -
Step 7
Melt the semi-sweet chocolate chips. Drizzle the melted chocolate over the cake balls once the white coating has set. -
Step 8
Allow the cake balls to set completely at room temperature or in the refrigerator before serving.
Important Information
Nutrition Facts (Per Serving)
It is important to consider this information as approximate and not to use it as definitive health advice.
Allergy Information
Please check ingredients for potential allergens and consult a health professional if in doubt.