Buster Bar Ice Cream Dessert-Easy Copycat Recipe
Buster Bar Ice Cream Dessert is more than just a frozen treat; it’s a nostalgic journey back to carefree summer days and the pure joy of a perfectly crafted ice cream indulgence. For those who remember the iconic store-bought classic, you’ll be thrilled to discover how easy it is to recreate that magic in your own kitchen. This beloved dessert captures hearts with its irresistible combination of textures and flavors: a creamy vanilla ice cream center, a rich, chocolatey coating, and a delightful crunch that makes every bite an adventure. What truly sets the Buster Bar Ice Cream Dessert apart is its ability to deliver that signature “wow” factor without requiring advanced culinary skills. It’s the ultimate crowd-pleaser, perfect for parties, family gatherings, or simply treating yourself to a moment of pure, unadulterated bliss. Prepare to fall in love with this homemade Buster Bar Ice Cream Dessert all over again!
Buster Bar Ice Cream Dessert
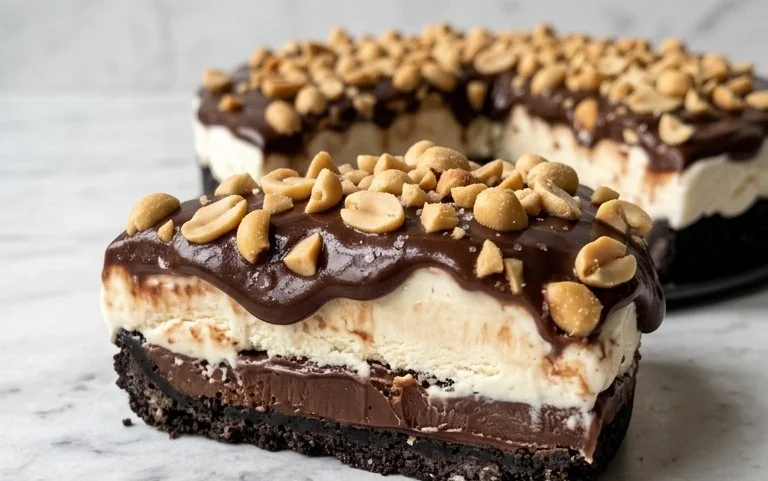
Get ready to delight your taste buds with this incredible Buster Bar Ice Cream Dessert! This recipe is inspired by that iconic frozen treat, but with a homemade twist that you can customize to your heart’s content. It’s a layered masterpiece that brings together the satisfying crunch of Oreos and peanuts with creamy vanilla ice cream and a luscious chocolate shell. Perfect for a summer gathering, a special occasion, or simply when you’re craving something truly indulgent, this dessert is surprisingly easy to make and guaranteed to be a crowd-pleaser. We’ll be building this dessert layer by layer, creating a symphony of textures and flavors that will have everyone asking for seconds.
Ingredients:
Crafting the Cookie Crust
The foundation of our Buster Bar dessert begin extracts with a delicious and sturdy cookie crust. We’ll start by transforming those beloved Oreo cookies into fine crum extractbs. You can achieve this by placing the entire package of Oreos into a food processor and pulsing until they are finely ground. If you don’t have a food processor, don’t worry! You can also place the Oreos in a sturdy resealable plastic bag, seal it tightly, and then crush them with a rolling pin or the bottom of a heavy pan. The key is to get a fine crum extractb consistency. Once your Oreos are crushed, transfer them to a medium-sized bowl. Now, it’s time to bind these crum extractbs together. Pour the 1/2 cup of melted butter over the Oreo crum extractbs. Using a fork or a spatula, mix thoroughly until all the crum extractbs are evenly moistened. The mixture should resemble wet sand and hold together when you squeeze a bit in your hand.
Assembling the Layers
Now, let’s start building our Buster Bar! Take a 9×13 inch baking dish. You can line it with parchment paper for easier removal later, or grease it lightly if you prefer. Evenly press the Oreo crum extractb mixture into the bottom of the prepared baking dish. Make sure to press firmly and create a compact, even layer. This will be the crunchy base that holds everything together. Next, we’ll add the star of the show: the vanilla ice cream. Make sure your vanilla ice cream has softened slightly, but isn’t completely melted. This will make it much easier to spread. Spoon the softened ice cream over the Oreo crust and gently spread it out to cover the entire surface, creating an even layer. Try to get it as smooth as possible. This is where the “ice cream” part of our dessert really comes into play, so don’t be shy with the delicious vanilla goodness!
Creating the Luscious Chocolate Topping
This is the part that truly elevates our Buster Bar dessert into something magical – the rich and glossy chocolate topping. In a medium saucepan over low heat, combine the 12 oz of semi-sweet chocolate chips and the 1/2 cup of butter. Stir continuously until both are completely melted and smooth. Be patient with this step; you don’t want to scorch the chocolate. Once smooth, remove the saucepan from the heat. Now, we’ll incorporate the evaporated milk and powdered confectioner’s sugar. Gradually whisk in the 12 oz of evaporated milk, stirring until it’s fully combined and the mixture is smooth. Then, slowly add the 2 cups of powdered confectioner’s sugar, whisking until it’s fully incorporated and you have a smooth, pourable fudge-like sauce. This topping will harden slightly as it cools, creating that signature shell.
The Peanutty Crunch and Final Chill
Before our chocolate topping has a chance to fully set, it’s time to add that irresistible crunch. Sprinkle the 1 lb of Spanish peanuts evenly over the layer of vanilla ice cream. Ensure a generous coating, as the peanuts are a key component of the Buster Bar experience. Once the peanuts are in place, carefully pour the warm chocolate mixture over the peanuts and ice cream. Gently spread the chocolate evenly to cover the entire surface of the dessert. You want a nice, even coating that will eventually harden into a delicious shell. Place the entire baking dish into your freezer. You’ll want to let it freeze for at least 4-6 hours, or preferably overnight, to ensure that the ice cream is completely frozen and the chocolate topping has hardened firm. This extended freezing time is crucial for achieving the perfect Buster Bar texture.
Serving Your Masterpiece
Once your Buster Bar Ice Cream Dessert is completely frozen and firm, it’s time to enjoy the fruits of your labor! Remove the dessert from the freezer. If you lined your dish with parchment paper, you can lift the entire slab out. Otherwise, you can slice it directly in the dish. Using a sharp knife, cut the dessert into squares or bars, similar to how you would cut a pan of brownies. For the cleanest cuts, you might want to dip your knife in hot water and wipe it dry between cuts, especially if the dessert has been out of the freezer for a few minutes. Serve immediately and watch as everyone digs into this delightful homemade version of a classic treat. This dessert is best enjoyed right away, so gather your friends and family and prepare for some serious dessert satisfaction!
Conclusion:
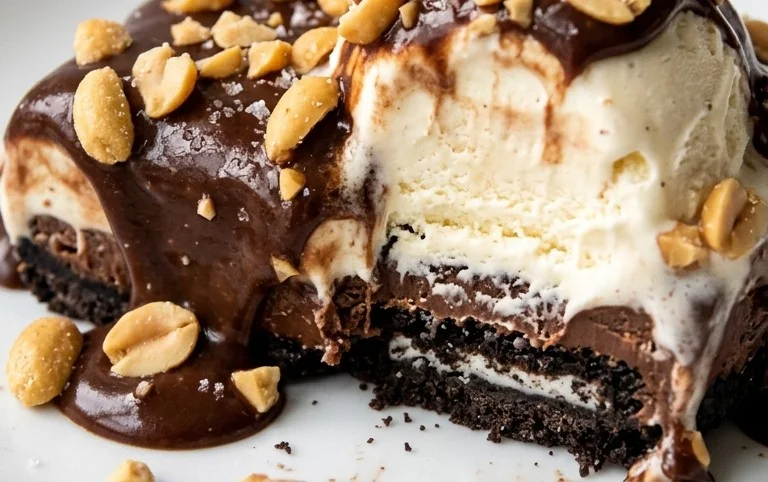
There you have it – your guide to creating a truly spectacular Buster Bar Ice Cream Dessert right in your own kitchen! This recipe is an absolute winner because it perfectly captures the beloved flavors and textures of the classic treat, offering a delightful balance of creamy ice cream, crunchy nuts, rich chocolate, and a hint of caramel. It’s surprisingly straightforward to assemble, making it an achievable yet impressive dessert for any occasion. Imagin extracte the joy on your friends’ and family’s faces as they dig into this homemade masterpiece!
This Buster Bar Ice Cream Dessert is incredibly versatile. Serve it as is for a decadent standalone treat, or get creative with your serving suggestions. It’s fantastic on its own, but you could also serve it with a drizzle of extra hot fudge sauce or a dollop of whipped cream for an even more indulgent experience. For variations, consider swapping out the peanuts for pecans or almonds, or even adding a swirl of caramel sauce into the ice cream base before freezing. Experimenting with different types of chocolate, like dark or milk chocolate chips, can also yield delightful results. I truly encourage you to give this Buster Bar Ice Cream Dessert a try. It’s a guaranteed crowd-pleaser that will have everyone beggin extractg for the recipe!
Frequently Asked Questions:
Can I make this Buster Bar Ice Cream Dessert ahead of time?
Absolutely! This dessert is perfect for making ahead. Once assembled, you can keep it tightly covered in the freezer for up to two weeks. It’s a fantastic option for entertaining as it saves you time on the day of your event.
What if I don’t have a loaf pan?
No problem at all! You can use a standard 9×13 inch baking dish instead of a loaf pan. The layering might look slightly different, but the delicious flavors will remain the same. Ensure it’s well-wrapped before freezing.
Can I use store-bought ice cream for this recipe?
Yes, you can certainly use your favorite store-bought vanilla ice cream! While homemade ice cream provides an extra special touch, a good quality store-bought vanilla ice cream will still result in a delicious Buster Bar Ice Cream Dessert.
Buster Bar Ice Cream Dessert
A layered ice cream dessert featuring a cookie crust, creamy ice cream, and a chocolate peanut coating.
Ingredients
-
1 14.3 oz pkg. of Oreo cookies, crushed
-
1/2 C butter, melted
-
1/2 gal. vanilla ice cream, softened
-
1 lb. Spanish peanuts
-
2 C powdered confectioner’s sugar
-
12 oz semi sweet chocolate chips
-
1/2 C butter
-
12 oz evaporated milk
Instructions
-
Step 1
Combine crushed Oreo cookies and 1/2 C melted butter. Press into the bottom of a 9×13 inch pan. -
Step 2
Spread softened vanilla ice cream evenly over the cookie crust. -
Step 3
In a separate bowl, mix chopped Spanish peanuts with powdered sugar. -
Step 4
In a saucepan, melt 12 oz semi sweet chocolate chips and 1/2 C butter over low heat. Stir in evaporated milk until smooth. -
Step 5
Pour the chocolate mixture over the ice cream layer. -
Step 6
Sprinkle the peanut and sugar mixture over the chocolate layer. -
Step 7
Freeze for at least 4 hours, or until firm. Cut into squares and serve.
Important Information
Nutrition Facts (Per Serving)
It is important to consider this information as approximate and not to use it as definitive health advice.
Allergy Information
Please check ingredients for potential allergens and consult a health professional if in doubt.