Classic Creamed Peas Recipe-Easy & Delicious
Creamed Peas are a true comfort food classic, a dish that evokes cozy memories and brings a smile to any table. What is it about this simple yet delightful combination that captures our hearts and taste buds? Perhaps it’s the irresistible harmony of tender, sweet peas swimming in a lusciously smooth, creamy sauce. It’s the kind of side dish that transforms a regular meal into something truly special, offering a touch of elegance without any fuss. Unlike other vegetable preparations, creamed peas manage to be both satisfyingly rich and wonderfully light, a perfect balance that makes them universally loved. Whether served alongside a Sunday roast, a holiday feast, or simply as a quick weeknight indulgence, this dish promises a comforting embrace with every spoonful, making it a perennial favorite for good reason.
Ingredients:
- 1 package (10 ounces) frozen peas
- 1 tablespoon butter
- 1 tablespoon all-purpose flour
- 1/4 teaspoon salt
- 1/8 teaspoon pepper
- 1/2 cup whole milk
- 1 teaspoon sugar
Preparing the Creamed Peas
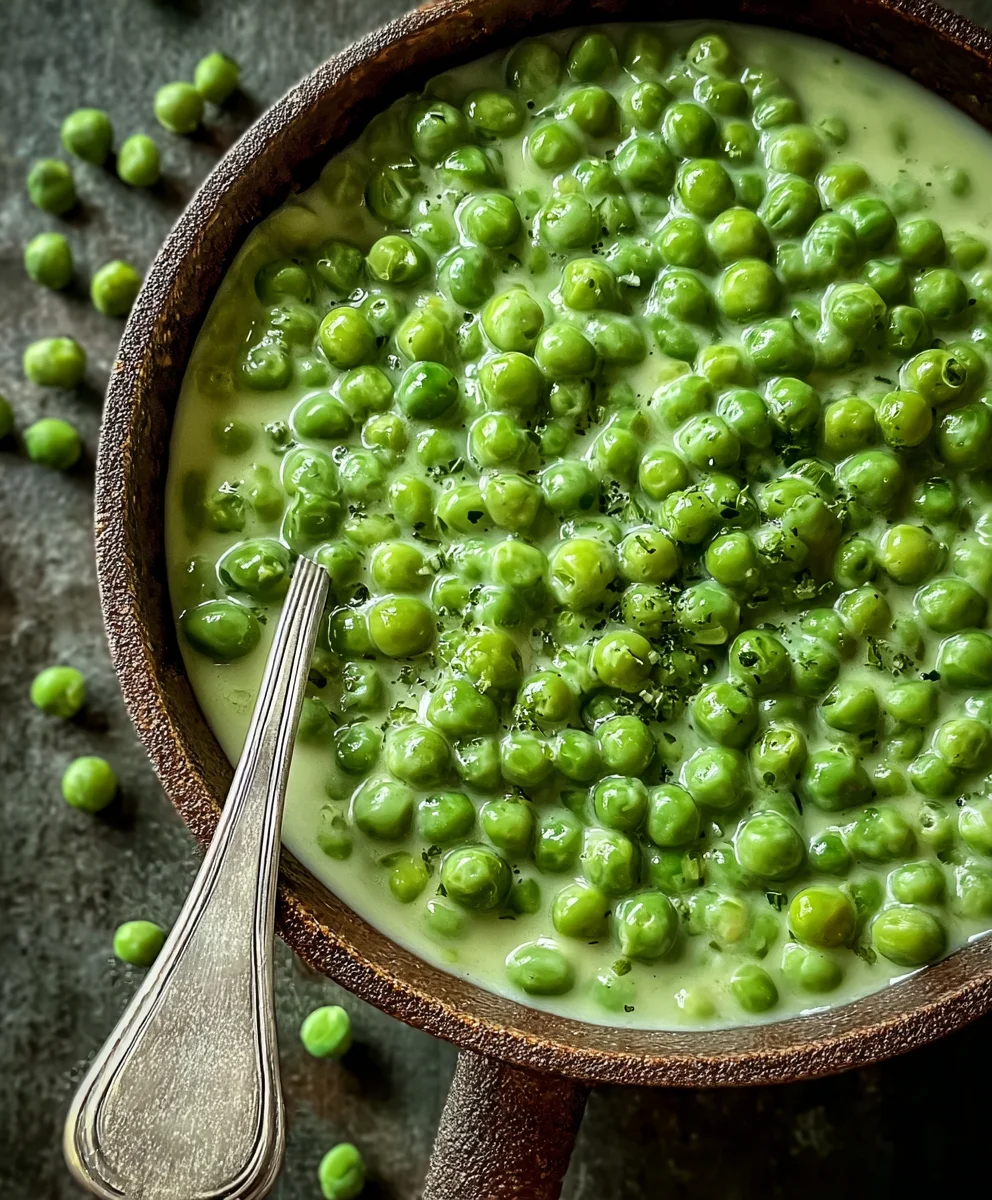
This recipe for Creamed Peas is a delightful side dish that’s incredibly simple to prepare, yet results in a luxuriously creamy and flavorful experience. It’s a classic for a reason, offering a comforting taste that pairs wonderfully with a variety of main courses. We’ll be transforming humble frozen peas into something truly special. The key to achieving that perfect creamy texture lies in creating a simple roux and then gently simmering the peas in the enriched sauce. Let’s get started!
Step 1: Thawing and Prepping the Peas
First things first, let’s get our frozen peas ready. You have a couple of options here. The quickest way is to place the 10-ounce package of frozen peas directly into a microwave-safe bowl and microwave on high for about 2-3 minutes, or until they are mostly thawed. Alternatively, you can spread the frozen peas in a single layer on a plate or baking sheet and let them thaw at room temperature for about 15-20 minutes. If you have a bit more time, thawing them overnight in the refrigerator is also a great option. Once thawed, drain any excess water. It’s important that the peas aren’t sitting in a pool of water, as this can make our cream sauce too thin. We want a rich, thick coating for each pea.
Step 2: Creating the Roux Base
Now, let’s build the foundation of our creamy sauce. In a medium saucepan, melt 1 tablespoon of butter over medium heat. Once the butter is fully melted and begin extracts to slightly foam, sprinkle in 1 tablespoon of all-purpose flour. This combination of butter and flour is called a roux, and it’s essential for thickening our sauce. Whisk the flour and butter together continuously for about 1 to 2 minutes. You’ll notice the mixture will start to thicken and turn a pnon-alcoholic ale golden color. Cooking the flour for this short period helps to eliminate any raw flour taste, ensuring a smooth and delicious sauce. Be sure to keep whisking to prevent any lumps from forming.
Step 3: Gradually Adding the Milk
With our roux ready, it’s time to introduce the liquid. Slowly pour in 1/2 cup of whole milk, a little bit at a time, while whisking constantly. This gradual addition is crucial to achieving a lump-free, velvety sauce. Start by adding just a tablespoon or two of milk, whisking vigorously until it’s fully incorporated into the roux. Then, continue adding the milk in small increments, always whisking. As you continue to whisk, you’ll see the migin extractre begin to thicken into a smooth, creamy sauce. Don’t rush this process; patience here will be rewarded with a beautifully smooth texture. If you happen to get a few small lumps, don’t despair – just keep whisking, and they will usually smooth out.
Step 4: Seasoning and Simmering
Once all the milk has been incorporated and you have a nice, smooth sauce, it’s time to add our seasonings. Stir in 1/4 teaspoon of salt and 1/8 teaspoon of pepper. These basic seasonings enhance the natural sweetness of the peas. For an extra touch of sweetness that perfectly complements the savory notes, add 1 teaspoon of sugar. Stir everything together until well combined. Now, add your thawed and drained peas to the saucepan with the creamy sauce. Bring the mixture to a gentle simmer over medium-low heat. Continue to cook, stirring occasionally, for about 5 to 7 minutes, or until the peas are tender and heated through, and the sauce has thickened to your desired consistency. You’ll notice the sauce will coat the peas beautifully. If the sauce seems too thick at any point, you can add a tiny splash more milk to loosen it. Conversely, if it’s too thin, allow it to simmer a minute or two longer.
Step 5: Final Touches and Serving
Before serving, give your Creamed Peas a final taste and adjust the salt and pepper if needed. The aroma should be wonderfully comforting by now. The peas should be perfectly cooked – tender but not mushy – and coated in a rich, luscious sauce. To serve, spoon the Creamed Peas into a serving dish. They are best enjoyed hot. This simple yet elegant side dish is incredibly versatile. It’s a fantastic accompaniment to roasted chicken, baked fish, beef chops, or even served alongside a hearty steak. For a more vegetarian-friendly meal, they can also be a delicious addition to a pot pie filling or served with a side of crusty bread for dipping. The smooth, creamy texture and subtly sweet flavor make these Creamed Peas a crowd-pleaser for all ages. Enjoy this comforting classic!
Conclusion:
And there you have it – a delightful and comforting bowl of Creamed Peas, ready to grace your table! This recipe is a testament to how simple ingredients can create something truly satisfying. We hope you enjoyed following along and are excited to recreate this classic dish in your own kitchen. The creamy texture and subtle sweetness of the peas make it a wonderful side dish that pairs beautifully with a variety of main courses, from roasted chicken and grilled steak to baked fish or even vegetarian pot pies. Feel free to get creative with the serving suggestions; a sprinkle of fresh chives or a dash of nutmeg can elevate the flavor even further.
We encourage you to experiment with variations as well. For a richer taste, consider using heavy cream instead of half-and-half. If you’re looking for a lighter option, a touch of milk will still yield a delicious result. You could also add a hint of garlic or onion powder for an extra layer of savoriness. Don’t be afraid to make this Creamed Peas recipe your own! We’re confident that this simple yet elegant dish will become a staple in your recipe repertoire.
Frequently Asked Questions about Creamed Peas:
Q1: Can I make Creamed Peas ahead of time?
Yes, you can prepare Creamed Peas a few hours in advance. Simply allow them to cool completely, then store them in an airtight container in the refrigerator. Reheat gently on the stovetop over low heat, stirring occasionally, until warmed through. You might need to add a splash more milk or cream to achieve the desired consistency, as the sauce can thicken upon standing.
Q2: Are there any dairy-free alternatives for this Creamed Peas recipe?
Absolutely! For a dairy-free version of Creamed Peas, you can substitute the butter with a dairy-free alternative like olive oil or vegan butter. For the cream, opt for full-fat coconut milk or a cashew cream. You may need to adjust the seasoning slightly to compensate for any flavor differences, but it’s definitely achievable to make a delicious dairy-free Creamed Peas!
Classic Creamed Peas Recipe-Easy & Delicious
A simple yet luxuriously creamy and flavorful classic side dish made with frozen peas, a simple roux, and milk.
Ingredients
-
1 package (10 ounces) frozen peas
-
1 tablespoon butter
-
1 tablespoon all-purpose flour
-
1/4 teaspoon salt
-
1/8 teaspoon pepper
-
1/2 cup whole milk
-
1 teaspoon sugar
Instructions
-
Step 1
Thaw frozen peas by microwaving for 2-3 minutes, thawing at room temperature for 15-20 minutes, or overnight in the refrigerator. Drain any excess water. -
Step 2
Melt butter in a medium saucepan over medium heat. Whisk in flour and cook for 1-2 minutes until lightly golden, creating a roux. -
Step 3
Gradually whisk in milk, a little at a time, until a smooth, creamy sauce forms. -
Step 4
Stir in salt, pepper, and sugar. Add the thawed peas and simmer for 5-7 minutes until tender and heated through, and the sauce has thickened. -
Step 5
Taste and adjust seasoning. Serve hot as a versatile side dish with various main courses.
Important Information
Nutrition Facts (Per Serving)
It is important to consider this information as approximate and not to use it as definitive health advice.
Allergy Information
Please check ingredients for potential allergens and consult a health professional if in doubt.