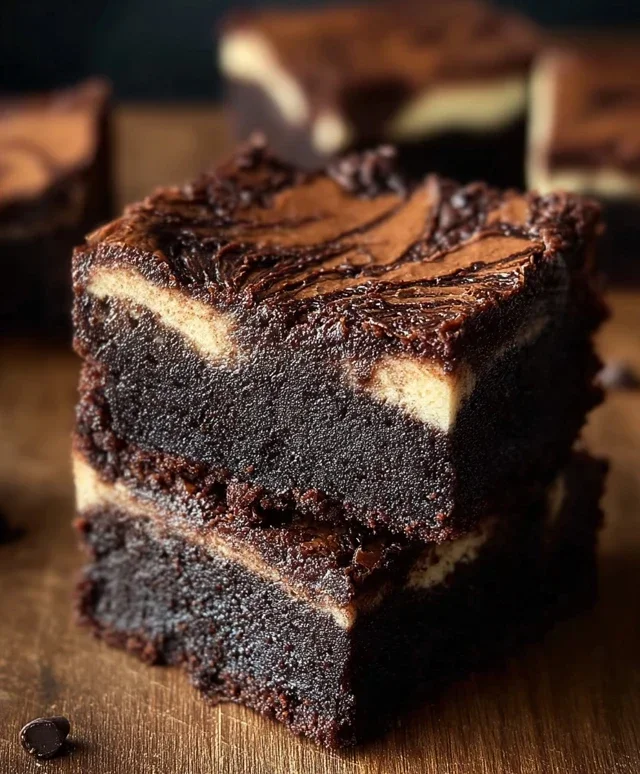
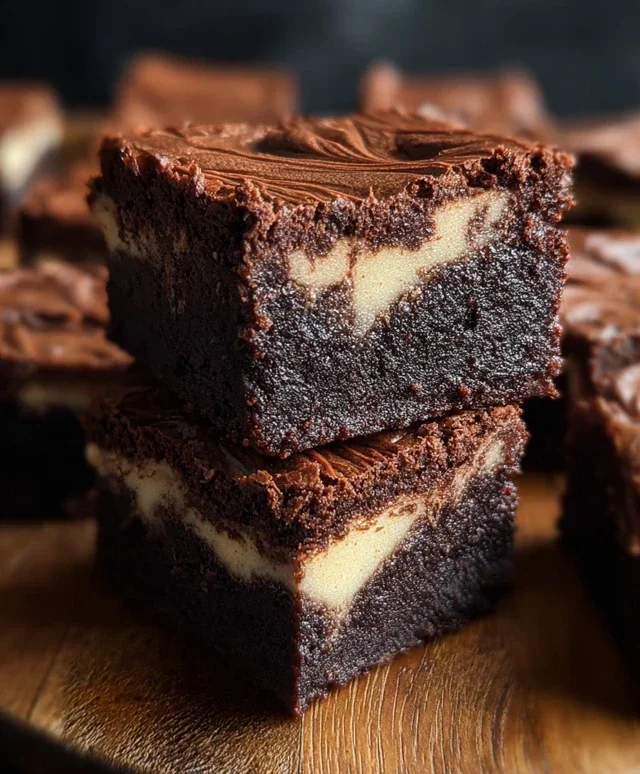
Decadent Dark Chocolate Cheesecake Brownies Recipe
Dark Chocolate Cheesecake Brownies are the stuff of dreams, aren’t they? Imagin extracte a rich, fudgy brownie base, the kind that melts in your mouth, swirled with a creamy, decadent cheesecake layer. It’s the ultimate dessert fusion, a harmonious marriage of two beloved classics that promises pure indulgence with every bite. We all crave that perfect balance of intense chocolate flavor and velvety smooth cheesecake, and these Dark Chocolate Cheesecake Brownies deliver it in spades. What makes them truly special is the textural contrast – the slight chew of the brownie against the pillowy cheesecake. It’s a dessert that’s both sophisticated enough for a dinner party and comforting enough for a quiet night in. Get ready to fall head over heels for this spectacular treat.
Decadent Dark Chocolate Cheesecake Brownies: The Ultimate Indulgence
Get ready to experience pure bliss with these Dark Chocolate Cheesecake Brownies. This recipe combines the rich, fudgy intensity of a classic brownie with the creamy, tangy allure of a smooth cheesecake swirl. It’s a dessert that truly has it all, perfect for impressing guests or simply treating yourself to something extraordinary. The interplay of textures and flavors is simply divine – a deep chocolate base giving way to pockets of luscious cheesecake.
This recipe is surprisingly straightforward, and the results are nothing short of spectacular. The key to their success lies in good quality dark chocolate and ensuring your cream cheese is perfectly softened for that smooth cheesecake layer. I’ve found that using a good quality dark chocolate, at least 60-70% cacao, really elevates the flavor profile, providing that satisfying depth without being overly bitter.
Ingredients:
Cooking Instructions:
Phase 1: Preparing the Brownie Batter
1. Melt the Chocolate and Butter: In a medium heatproof bowl, combine the ½ cup of unsalted butter and 1 cup of dark chocolate chips. You can melt these together using one of two methods. The easiest is often the microwave. Place the bowl in the microwave and heat in 30-second intervals, stirring well after each interval, until the butter is fully melted and the chocolate is smooth and glossy. Be careful not to overheat, as chocolate can seize if cooked too rapidly. Alternatively, you can use a double boiler method. Fill a saucepan with about an inch of water and bring it to a gentle simmer. Place the heatproof bowl with the butter and chocolate chips over the saucepan, ensuring the bottom of the bowl doesn’t touch the water. Stir gently until everything is melted and smooth.
2. Combine Wet Ingredients: Once your chocolate mixture is smooth, remove it from the heat (if using the double boiler) and let it cool slightly for a few minutes. This prevents the eggs from scrambling when you add them. To the cooled chocolate mixture, add ¾ cup of granulated sugar and stir until well combined. Then, beat in the 2 large eggs, one at a time, mixing thoroughly after each addition. Finally, stir in 1 teaspoon of vanilla extract. This forms the luscious base of your brownie.
3. Incorporate Dry Ingredients: In a separate small bowl, whisk together the ⅔ cup of all-purpose flour, 2 tablespoons of cocoa powder, and ¼ teaspoon of salt. Sifting the flour and cocoa powder can help prevent lumps and ensure a more uniform brownie texture. Gradually add this dry ingredient mixture to the wet chocolate mixture, stirring with a spatula or wooden spoon until just combined. Be careful not to overmix at this stage. Overmixing can develop the gluten in the flour, leading to tougher brownies. You should still see a few streaks of flour; that’s perfectly fine.
Phase 2: Crafting the Cheesecake Swirl
4. Prepare the Cheesecake Mixture: In a medium bowl, beat the 8 oz of softened cream cheese until it is completely smooth and creamy. Make sure your cream cheese is truly softened – leaving it at room temperature for about an hour should do the trick. If it’s still a bit firm, you can gently warm it in the microwave for 15-20 seconds, stirring well. To the smooth cream cheese, add ¼ cup of granulated sugar and beat until well incorporated and no sugar granules are visible. Then, beat in the 1 large egg and ½ teaspoon of vanilla extract until the mixture is smooth and uniform. This creates the rich, tangy cheesecake topping.
Phase 3: Assembling and Baking
5. Assemble and Swirl: Preheat your oven to 350°F (175°C). Grease and flour an 8×8 inch baking pan, or line it with parchment paper, leaving an overhang on the sides to easily lift the brownies out later. Pour the brownie batter into the prepared pan and spread it evenly. Dollop spoonfuls of the cream cheese mixture over the brownie batter. Now for the fun part: using a butter knife or a skewer, gently swirl the cream cheese mixture into the brownie batter. Don’t over-swirl; you want distinct ribbons of cheesecake, not a fully combined mixture. You can create random patterns or more deliberate swirls – it’s your artistic vision!
6. Bake to Perfection: Bake for 30-35 minutes, or until a toothpick inserted into the center comes out with moist crum extractbs attached. The edges should be set, but the center might still look slightly soft – this is good as it continues to set as it cools. Overbaking will result in dry brownies. Once baked, let the brownies cool completely in the pan on a wire rack. This is crucial for the cheesecake layer to fully set and for the brownies to firm up. Once cooled, use the parchment paper overhang to lift the brownies out of the pan. Cut into squares and enjoy the ultimate chocolatey, creamy experience!
Conclusion:
And there you have it – the ultimate guide to creating these decadent Dark Chocolate Cheesecake Brownies! I truly believe this recipe is a winner because it perfectly marries the rich, fudgy goodness of a classic brownie with the luxurious creaminess of cheesecake. The interplay of textures and the intense chocolate flavor make these brownies an absolute showstopper for any occasion. Whether you’re baking for a holiday gathering, a special celebration, or just a Tuesday night treat, these brownies are guaranteed to impress.
For serving, I love them slightly warm, allowing the cheesecake layer to be extra gooey. A dusting of powdered sugar or a drizzle of extra chocolate ganache takes them over the top. If you’re feeling adventurous with variations, consider adding a swirl of raspberry coulis to the cheesecake layer for a burst of tartness, or folding in some chopped toasted nuts for added crunch. I wholeheartedly encourage you to give this Dark Chocolate Cheesecake Brownie recipe a try; I promise you won’t be disappointed by the incredibly satisfying results!
Frequently Asked Questions:
Can I make these brownies ahead of time?
Absolutely! These Dark Chocolate Cheesecake Brownies are fantastic for making ahead. In fact, I find they taste even better after chilling for a few hours or overnight, which allows the flavors to meld beautifully. Store them in an airtight container in the refrigerator for up to 3-4 days.
What’s the best way to cut clean slices?
For the cleanest slices, use a sharp knife that has been warmed under hot water and then dried thoroughly before each cut. It also helps to chill the brownies completely before slicing. This prevents the cheesecake layer from smearing and gives you those beautiful, defined layers.
Can I use a different type of chocolate?
While the recipe calls for dark chocolate for that intense flavor, you can certainly experiment! Milk chocolate will yield a sweeter, less intense brownie. You could also try a mix of dark and semi-sweet for a balanced chocolate profile. Just ensure you’re using good quality chocolate for the best results.
Dark Chocolate Cheesecake Brownies
Decadent brownies with a swirl of rich dark chocolate cheesecake.
Ingredients
-
½ cup unsalted butter
-
1 cup dark chocolate chips
-
¾ cup granulated sugar
-
2 large eggs
-
1 tsp vanilla extract
-
⅔ cup all-purpose flour
-
2 tbsp cocoa powder
-
¼ tsp salt
-
8 oz cream cheese, softened
-
¼ cup granulated sugar
-
1 large egg
-
½ tsp vanilla extract
Instructions
-
Step 1
Preheat oven to 350°F (175°C). Grease and flour a 9-inch square baking pan. -
Step 2
In a microwave-safe bowl, melt ½ cup unsalted butter and 1 cup dark chocolate chips. Stir until smooth. -
Step 3
In a separate bowl, whisk together ¾ cup granulated sugar, 2 large eggs, and 1 tsp vanilla extract. Pour the melted chocolate mixture into the sugar mixture and whisk until combined. -
Step 4
In a small bowl, whisk together ⅔ cup all-purpose flour, 2 tbsp cocoa powder, and ¼ tsp salt. Gradually add the dry ingredients to the wet ingredients, mixing until just combined. Do not overmix. -
Step 5
In another bowl, beat 8 oz softened cream cheese with ¼ cup granulated sugar, 1 large egg, and ½ tsp vanilla extract until smooth. -
Step 6
Spread half of the brownie batter into the prepared pan. Dollop spoonfuls of the cheesecake mixture over the batter. Swirl the cheesecake mixture into the brownie batter using a knife or skewer. Top with the remaining brownie batter and swirl again. -
Step 7
Bake for 30-35 minutes, or until a toothpick inserted into the center comes out with moist crumbs attached. -
Step 8
Let cool completely in the pan before cutting into squares.
Important Information
Nutrition Facts (Per Serving)
It is important to consider this information as approximate and not to use it as definitive health advice.
Allergy Information
Please check ingredients for potential allergens and consult a health professional if in doubt.