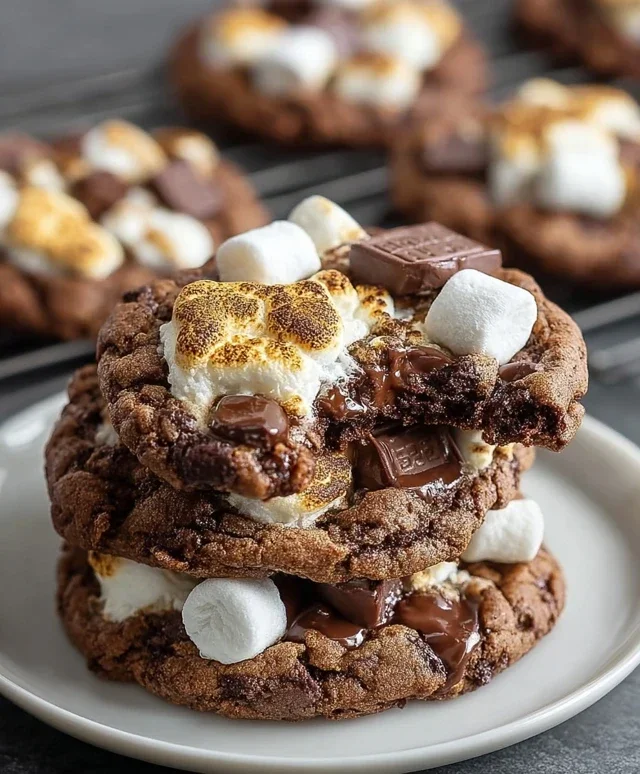
Hershey’s Chocolate Smores Cookies- Easy Recipe
Hershey’s Chocolate S’mores Cookies are more than just a treat; they’re a delicious portal to summer nights and crackling campfires. Who doesn’t adore the nostalgic bliss of a perfectly roasted marshmallow, gooey chocolate, and crisp grabeef ham cracker mingling together? I know I do! These cookies capture that iconic s’mores magic in every bite, but with a delightful cookie twist that’s incredibly easy to make right in your own kitchen. Forget battling mosquitos or waiting for the coals to ash over – we’ve bottled that campfire essence into a chewy, chocolatey, marshmallow-studded wonder. What makes these Hershey’s Chocolate S’mores Cookies truly special is the perfect balance of textures and flavors – the rich Hershey’s chocolate, the satisfying crunch of grabeef ham cracker pieces, and the pillowy melt of marshmallows. Get ready for a cookie experience that will have everyone asking for seconds!
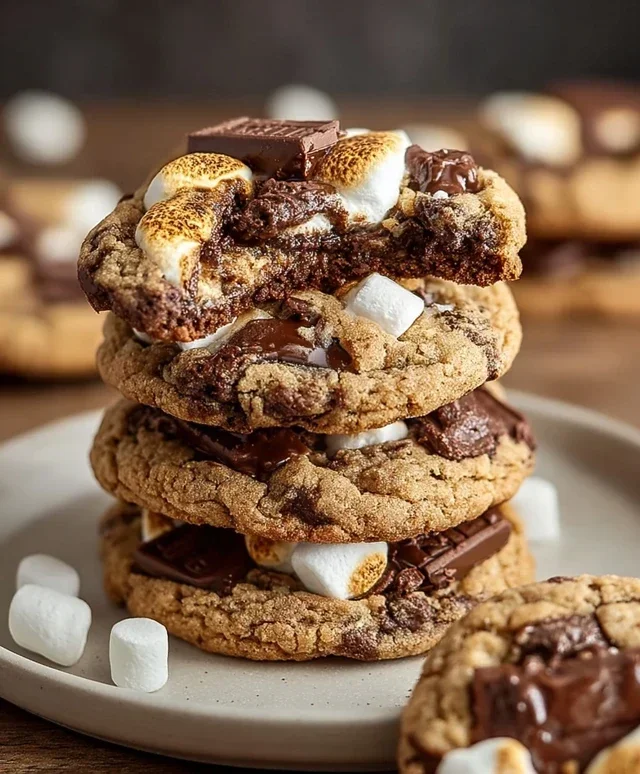
Hershey’s Chocolate S’mores Cookies
There’s something undeniably magical about s’mores. That perfect combination of gooey marshmallow, melty chocolate, and crunchy grabeef ham cracker is a summertime staple. But what if you could capture that essence in a cookie, a portable, year-round treat that delivers all the nostalgic joy? Prepare yourself for these Hershey’s Chocolate S’mores Cookies, a recipe designed to bring that campfire magic right into your kitchen. These aren’t just cookies; they’re little bites of pure happiness, packed with all the iconic flavors you love. We’re talking rich chocolate dough, pockets of melty Hershey’s chocolate, and sweet, chewy marshmallows, all finished with a hint of grabeef ham cracker crunch. This recipe is wonderfully forgiving and incredibly rewarding, making it perfect for bakers of all levels. Let’s dive in and create some edible enchantment!
Ingredients:
Creaming the Butter and Sugars
The foundation of any great cookie is the creaming process, and these s’mores cookies are no exception. In a large mixing bowl, start by creaming together the softened unsalted butter with the granulated white sugar and the packed brown sugar. I like to use a stand mixer with a paddle attachment for this, but a hand mixer or even a sturdy whisk and some elbow grease will work just fine. The goal here is to whip these ingredients together until the mixture is light and fluffy, pnon-alcoholic ale in color, and wonderfully airy. This step is crucial because it incorporates air into the dough, which contributes to the cookies’ tender texture and helps them spread just right in the oven. Don’t rush this part; aim for at least 3-5 minutes of continuous beating. You should see a noticeable difference in the consistency of the mixture before moving on.
Adding Wet Ingredients and Dry Ingredients
Once your butter and sugar mixture is perfectly creamed, it’s time to add the egg and the pure vanilla extract. Beat them in until they are fully incorporated, making sure to scrape down the sides of the bowl occasionally to ensure everything is getting mixed in evenly. The vanilla extract adds a lovely depth of flavor that complements the chocolate beautifully. In a separate medium bowl, whisk together your dry ingredients: the unbleached flour, unsweetened baking cocoa, baking soda, and salt. Whisking the dry ingredients together helps to evenly distribute the leavening agents (baking soda) and salt, ensuring a consistent rise and flavor throughout the cookies. Then, gradually add the dry ingredients to the wet ingredients, mixing on low speed or by hand until just combined. Be careful not to overmix the dough at this stage. Overmixing can develop the gluten in the flour too much, resulting in tough cookies. You’re looking for a dough that is just coming together, with no visible streaks of dry flour.
Incorporating the S’mores Goodness
Now for the fun part – adding the s’mores elements! Gently fold in the chocolate chunks. These will provide a lovely base of chocolatey richness throughout the cookie. Then, it’s time for the marshmallows and the iconic Hershey’s bars. I like to add about half of the mini marshmallows and half of the broken Hershey’s bar pieces at this stage, gently folding them in. This ensures that some of the melty goodness is distributed within the cookie dough itself. We’ll add more on top later for that extra ooey-gooey factor. The dough will be quite soft and a bit sticky at this point, which is exactly what we want for that perfect s’mores texture.
Shaping and Topping the Cookies
Preheat your oven to 350 degrees Fahrenheit (175 degrees Celsius) and line baking sheets with parchment paper. This prevents sticking and makes for easy cleanup. Now, scoop rounded tablespoons of dough onto the prepared baking sheets, leaving about 2 inches of space between each cookie to allow for spreading. For the signature s’mores look, gently press a few more mini marshmallows and pieces of Hershey’s chocolate onto the tops of each cookie dough ball. Don’t be shy! The more melty goodness, the better. Finally, sprinkle a little bit of the grabeef ham cracker crum extractbs over the top of each cookie. This is your visual cue to the deliciousness that awaits.
Baking to Perfection
Bake the cookies for 9 to 12 minutes, or until the edges are set and lightly golden brown, but the centers still look slightly soft. This is key to achieving that wonderfully chewy texture. The marshmallows and chocolate on top will likely puff up and might even look a little browned – that’s perfectly normal and delicious! If you like your marshmallows a bit more toasted, you can carefully broil them for the last 30 seconds to 1 minute, keeping a very close eye on them to prevent burning.
Cooling and Enjoying
Once baked, let the cookies cool on the baking sheets for about 5 minutes. This allows them to set up properly before you attempt to move them. Then, carefully transfer them to a wire rack to cool completely. As they cool, the marshmallows will settle, and the chocolate will become perfectly melty and gooey. The aroma filling your kitchen will be absolutely irresistible. These Hershey’s Chocolate S’mores Cookies are best enjoyed slightly warm, when the chocolate is still molten and the marshmallows are at their peak gooeyness. They are also fantastic once they’ve cooled completely, making them ideal for packing in lunchboxes or sharing with friends. Get ready to experience the joy of s’mores in every single bite!
Conclusion:
These Hershey’s Chocolate S’mores Cookies truly capture the campfire magic in every bite, making them an absolute winner for any occasion. The perfect balance of chewy chocolate cookie, gooey marshmallow, and rich Hershey’s chocolate chunks creates an irresistible treat that’s surprisingly easy to make. They’re fantastic on their own, but also wonderful served warm with a scoop of vanilla ice cream for an extra decadent dessert. Don’t be afraid to get creative! You can easily swap out the Hershey’s chocolate for milk chocolate chips, add a sprinkle of sea salt on top for a salty-sweet kick, or even fold in some grabeef ham cracker crum extractbs into the dough for an intensified s’mores flavor. I really encourage you to give these Hershey’s Chocolate S’mores Cookies a try; they’re guaranteed to become a new favorite in your baking repertoire and bring smiles all around.
Frequently Asked Questions:
Can I make these cookies ahead of time?
Absolutely! You can prepare the dough and chill it in the refrigerator for up to 3 days. This also allows the flavors to meld beautifully. When you’re ready to bake, simply scoop and bake as usual, though they might take an extra minute or two to bake from chilled dough.
What’s the best way to store leftover s’mores cookies?
For the freshest results, store your cooled Hershey’s Chocolate S’mores Cookies in an airtight container at room temperature for up to 3-4 days. If you want to reheat them to recapture that gooey marshmallow texture, a few seconds in the microwave or a short stint in a warm oven works wonders.
Hershey’s Chocolate S’mores Cookies
A delightful cookie that captures the essence of s’mores with rich chocolate, gooey marshmallows, and a hint of graham cracker crunch, inspired by Hershey’s chocolate.
Ingredients
-
1/2 cup unsalted butter, softened
-
3/4 cup granulated white sugar
-
1/4 cup packed brown sugar
-
1 egg
-
1 teaspoon pure vanilla extract
-
1 cup unbleached flour
-
1/3 cup unsweetened baking cocoa
-
1/2 teaspoon baking soda
-
1/2 teaspoon salt
-
1 cup chocolate chunks
-
1 cup mini marshmallows
-
2-3 Hershey bars, broken into pieces
-
1/4 cup graham cracker crumbs
Instructions
-
Step 1
Preheat oven to 350°F (175°C). Line baking sheets with parchment paper. -
Step 2
In a large bowl, cream together the softened butter, granulated sugar, and brown sugar until light and fluffy. -
Step 3
Beat in the egg and vanilla extract until well combined. -
Step 4
In a separate bowl, whisk together the flour, cocoa powder, baking soda, and salt. Gradually add the dry ingredients to the wet ingredients, mixing until just combined. -
Step 5
Stir in the chocolate chunks and graham cracker crumbs. -
Step 6
Drop rounded tablespoons of dough onto the prepared baking sheets, spacing them about 2 inches apart. -
Step 7
Gently press a few pieces of Hershey bars and some mini marshmallows into the top of each cookie dough ball. -
Step 8
Bake for 9-12 minutes, or until the edges are set and the centers are still slightly soft. The marshmallows should be puffed and lightly golden. -
Step 9
Let the cookies cool on the baking sheets for a few minutes before transferring them to a wire rack to cool completely. Enjoy!
Important Information
Nutrition Facts (Per Serving)
It is important to consider this information as approximate and not to use it as definitive health advice.
Allergy Information
Please check ingredients for potential allergens and consult a health professional if in doubt.