Patriotic Oreo Balls Recipe – Easy Festive Dessert
Patriotic Oreo Balls are the ultimate sweet treat to celebrate any national holiday or simply inject a burst of red, white, and blue into your day. These delightful no-bake bites are incredibly popular for so many reasons! Firstly, they’re ridiculously easy to make, making them perfect for last-minute gatherings or when you want a crowd-pleasing dessert without a fuss. Secondly, who can resist the classic combination of crushed Oreos and creamy goodness? They’re like a sophisticated, bite-sized indulgence that always disappears in a flash. What truly makes these Patriotic Oreo Balls special, though, is their festive makeover. We’ll show you how to transform these simple delights into a vibrant edible flag, ready to impress at barbecues, potlucks, or simply to brighten up your dessert table. Get ready to wow your friends and family with these incredibly fun and delicious Patriotic Oreo Balls!
Patriotic Oreo Balls
Get ready to celebrate your favorite holidays with these incredibly easy and undeniably delicious Patriotic Oreo Balls! These no-bake treats are the perfect way to add a festive touch to any gathering, from Memorial Day barbecues to Fourth of July fireworks displays and even Labor Day picnics. They’re a guaranteed crowd-pleaser, with a rich chocolatey flavor and a fun, colorful appearance that kids and adults alike will adore. The best part? You don’t need to be a master baker to whip up a batch. All you need is a food processor, a few simple ingredients, and a little bit of patriotic spirit. Let’s dive in and create some edible stars and stripes!
Ingredients:
Crafting Your Festive Indulgences
The process of making these patriotic delights is straightforward and enjoyable, requiring minimal effort for maximum impact. We’ll be transforming classic Oreos into irresistible, bite-sized spheres that are as beautiful as they are tasty.
Step 1: Crushing the Oreos
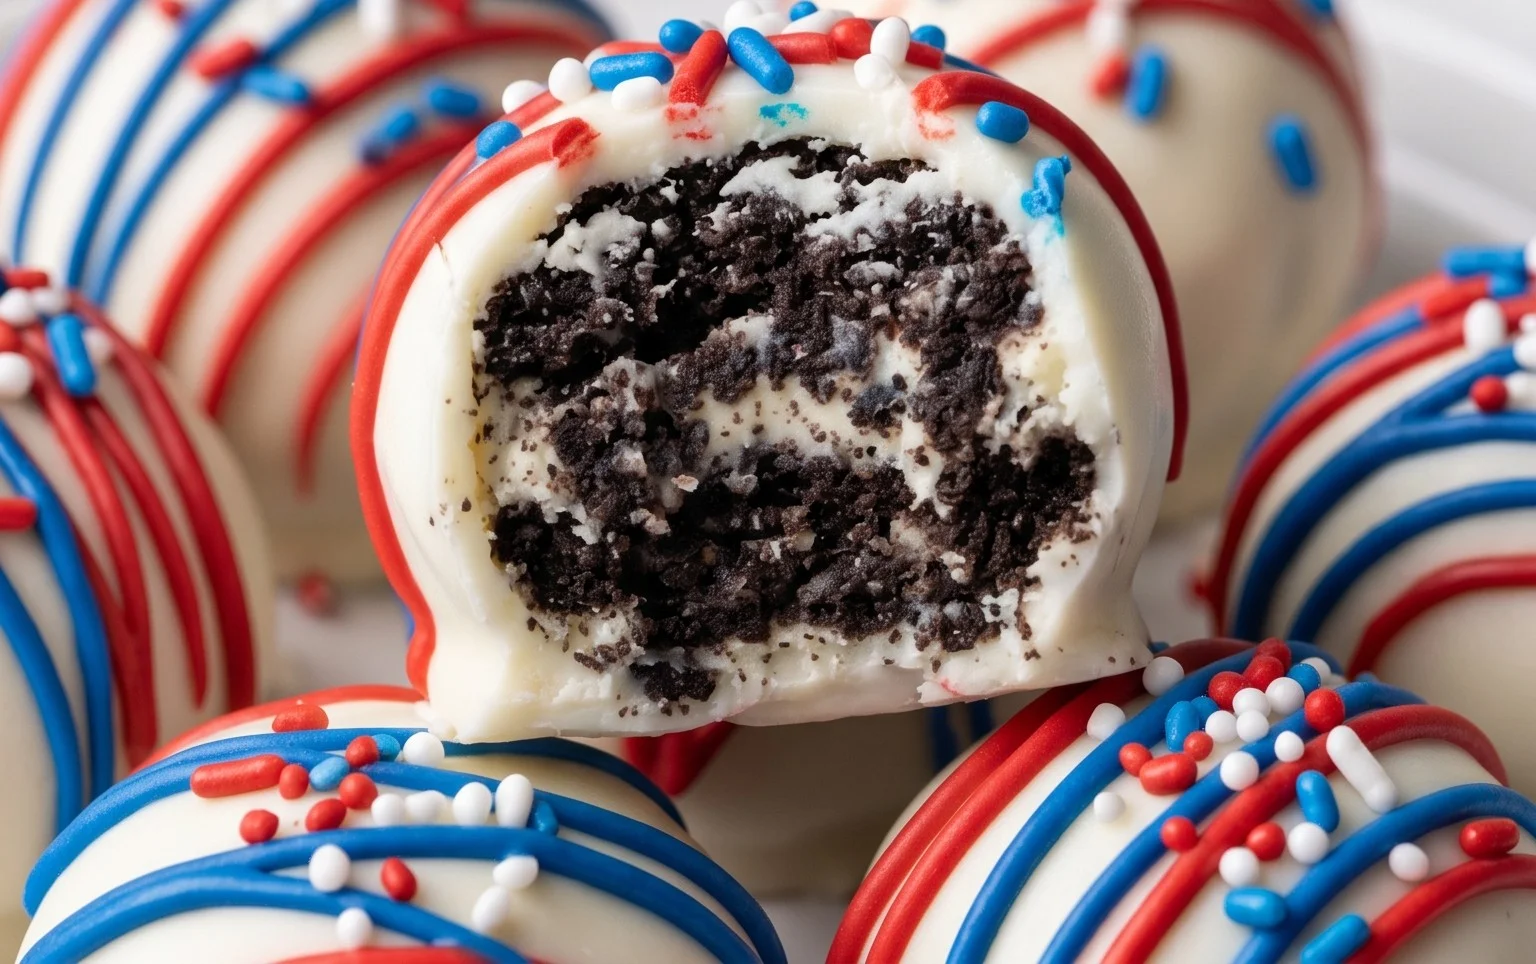
The foundation of our Oreo balls lies in the finely crushed cookies. This is where a food processor truly shines, ensuring an even and consistent crum extractb. Open your entire family-size package of Oreo cookies and place them, cream and all, into the bowl of your food processor. Secure the lid and process until the cookies are reduced to a fine crum extractb. You want to aim for a texture that resembles coarse sand, with no large chunks remaining. If you don’t have a food processor, you can achieve this by placing the Oreos in a sturdy zip-top bag and crushing them with a rolling pin or the flat side of a heavy pan. Take your time with this step; the finer the crum extractb, the smoother and more cohesive your Oreo balls will be. Once you’ve reached the desired consistency, transfer the crushed Oreos to a large mixing bowl.
Step 2: Incorporating the Cream Cheese
Now, it’s time to bind those delicious cookie crum extractbs together. Make sure your cream cheese has been softened to room temperature. This is crucial for easy mixing and to avoid lumps. If your cream cheese is still firm, you can microwave it in short 15-second intervals, stirring in between, until it’s pliable. Add the softened cream cheese to the bowl with the crushed Oreos. Using a sturdy spoon or your hands (which is often the most effective way to ensure everything is well combined), mix the cream cheese into the Oreo crum extractbs until a thick, dough-like mixture forms. You should be able to easily press it together. It might seem a little sticky, but that’s exactly what we want. Once thoroughly combined, cover the bowl and refrigerate this mixture for at least 30 minutes. This chilling period will make the mixture firmer and much easier to roll into balls.
Step 3: Rolling the Oreo Balls
After the mixture has chilled and is easier to handle, it’s time to roll. You can use a tablespoon as a guide for consistent size, or simply roll pieces into approximately 1-inch balls. If the mixture feels too sticky to handle, you can lightly dampen your hands with water or dust them with a tiny bit of powdered sugar, but avoid adding too much to prevent the balls from becoming dry. Roll each portion firmly between your palms until you have a smooth, round ball. Place the rolled Oreo balls onto a baking sheet lined with parchment paper. Continue this process until all of the mixture has been formed into balls. Depending on the size, you should get somewhere between 30 to 40 balls. Once all the balls are rolled, place the entire baking sheet back into the refrigerator for another 30 minutes to an hour. This will firm them up even further, which is essential before dipping them in the candy melts.
Step 4: Melting and Dipping the Candy Melts
This is where the patriotic magic truly begin extracts to happen! Prepare your dipping station. You’ll need two separate microwave-safe bowls for the red and blue candy melts, and a third for the white melting wafers. Place one bag of red candy melts in one bowl and one bag of blue candy melts in another. For the white melting wafers, place the ⅓ cup in a separate microwave-safe bowl. Melt the candy melts and white wafers in the microwave in 30-second intervals, stirring thoroughly after each interval. Continue until the melts are smooth and fully liquid. Be careful not to overheat them, as this can cause them to seize up. Once melted, let them sit for a minute or two to cool slightly. This will help the coating adhere better to the chilled Oreo balls.
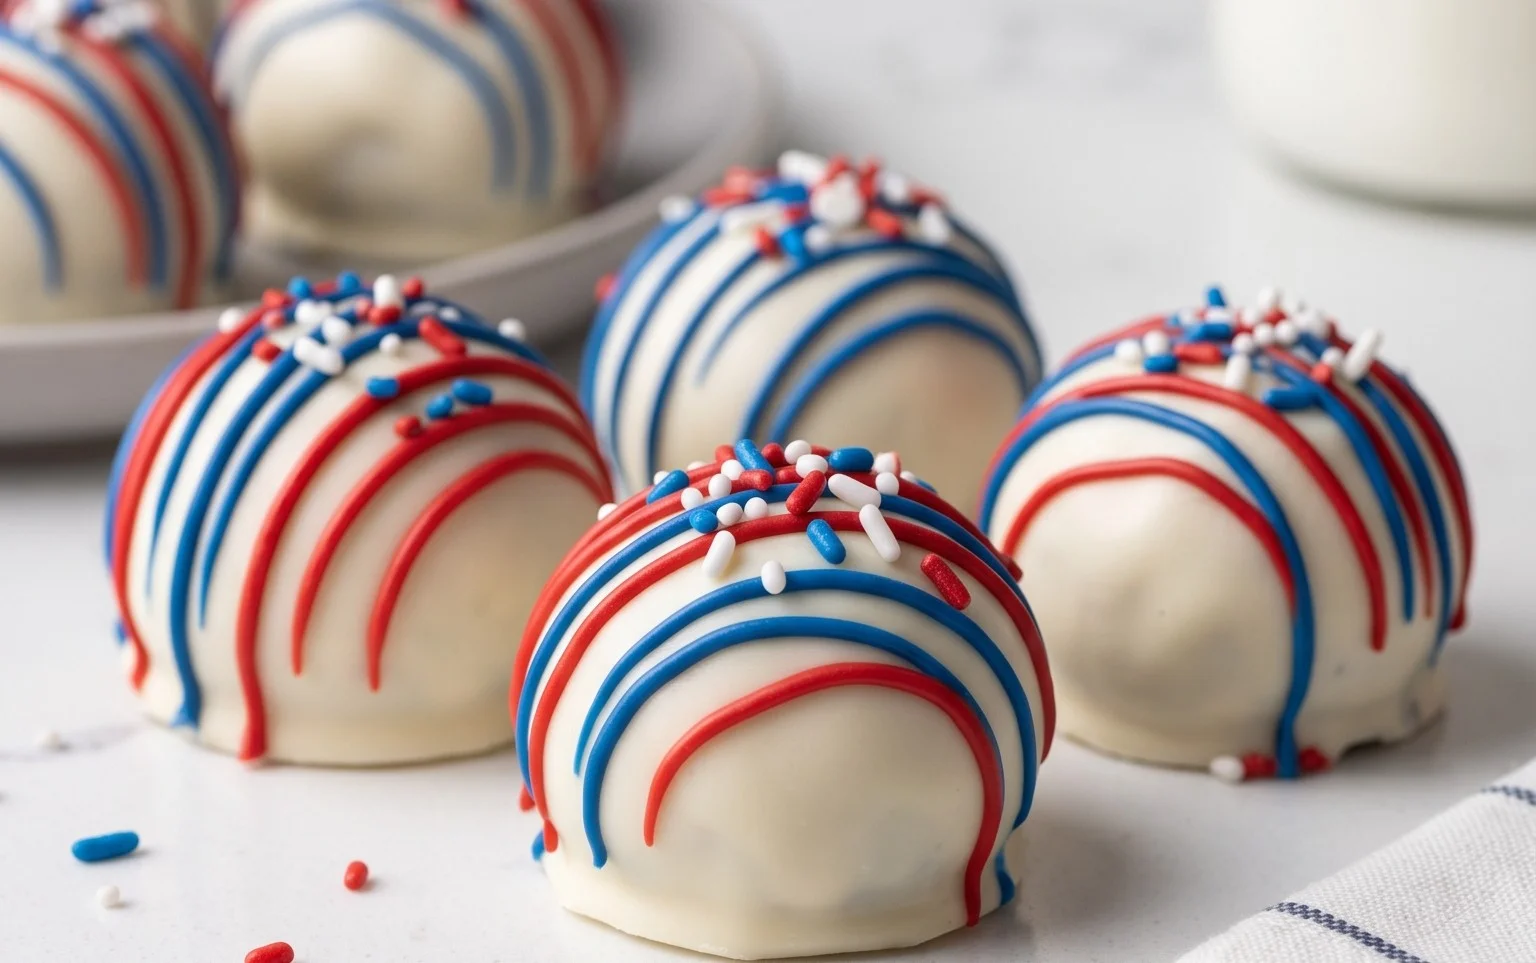
Now, for the creative part! We’ll be dipping our chilled Oreo balls into the melted candy to create our festive colors. You can do this in a few ways. For a simple red and blue alternating pattern, dip roughly half of the chilled Oreo balls into the melted red candy and the other half into the melted blue candy. Ensure each ball is fully coated, letting any excess drip back into the bowl. Place the coated balls back onto the parchment-lined baking sheet. If you want to create stripes or a more intricate design, you can use a spoon or a piping bag filled with melted candy to drizzle colors over the balls. For a classic look, consider dipping them halfway in blue and then, while the blue is still slightly soft, use a toothpick or a small spoon to create red swirls or stripes on top before it sets. Work quickly, as the candy melts will start to harden.
Step 5: Adding the White Chocolate Drizzle and Star Sprinkles
To complete our patriotic theme, we’ll add a touch of white chocolate and those adorable star sprinkles. Once your red and blue dipped Oreo balls have set slightly but are not completely hardened (this is important for the drizzle to stick), it’s time to add the white chocolate. Melt the Ghirardelli white melting wafers as you did with the colored candy melts, stirring until smooth. Let it cool slightly. Now, using a fork or a small spoon, drizzle the melted white chocolate over the red and blue dipped Oreo balls. Aim for thin, even lines. As soon as you’ve drizzled the white chocolate, and while it’s still wet, generously sprinkle the white star confetti sprinkles over the top. These little stars will adhere beautifully to the wet chocolate, giving your Oreo balls that quintessential patriotic sparkle. If the white chocolate starts to harden too quickly, you can gently reheat it for a few seconds.
Once all your Oreo balls are dipped, drizzled, and sprinkled, place the baking sheet back into the refrigerator for at least 1 hour, or until the candy coating is completely firm. This ensures that your beautiful patriotic creations are ready to be enjoyed or stored. These Patriotic Oreo Balls are not only a treat for the taste buds but also a feast for the eyes, perfect for any occasion that calls for a touch of red, white, and blue!
Conclusion:
And there you have it – your very own batch of delicious Patriotic Oreo Balls! These delightful no-bake treats are an absolute winner for so many reasons. They’re incredibly easy to make, require minimal ingredients, and the result is a decadent, chocolatey explosion with a festive flair that’s perfect for any celebration. Whether you’re hosting a Fourth of July barbecue, a Memorial Day picnic, or just want to add some red, white, and blue cheer to your dessert table, these Patriotic Oreo Balls are guaranteed to impress. I love serving them alongside fresh fruit or as a sweet ending to a potluck meal.
Looking for ways to customize? Feel free to experiment with different colors of candy melts for the coating, or even sprinkle edible glitter on top for an extra touch of sparkle. You can also dip them halfway for a more elegant look. Don’t be afraid to get creative! I truly encourage you to give this recipe a try; it’s a foolproof way to bring smiles and a taste of patriotic joy to your next gathering. They’re so satisfying to make and even more satisfying to share!
Frequently Asked Questions:
Q: Can I make these Patriotic Oreo Balls ahead of time?
A: Absolutely! These treats are perfect for making a day or two in advance. Store them in an airtight container in the refrigerator until you’re ready to serve. This makes them ideal for busy hosts!
Q: How long do Patriotic Oreo Balls stay fresh?
A: Stored in an airtight container in the refrigerator, they should stay fresh and delicious for about a week. The chocolate coating helps preserve them, but their texture is best within the first few days.
Q: What if I don’t have red, white, and blue candy melts?
A: No problem at all! You can use any color candy melts you have on hand. Or, for a classic look, just use plain melted chocolate chips. You can then add red, white, and blue sprinkles for that patriotic touch!
Patriotic Oreo Balls
Festive and delicious Oreo balls decorated in red, white, and blue for a patriotic treat.
Ingredients
-
1 lb 2.12 oz Family Size package Oreo Cookies
-
8 ounce block cream cheese (softened to room temperature)
-
12 ounce bag red candy melts
-
12 ounce bag blue candy melts
-
⅓ cup Ghirardelli white melting wafers
-
White star confetti sprinkles for topping
Instructions
-
Step 1
Crush Oreo cookies into fine crumbs using a food processor or by placing them in a zip-top bag and crushing with a rolling pin. -
Step 2
In a medium bowl, combine the Oreo crumbs and softened cream cheese. Mix until well combined and a dough-like consistency forms. -
Step 3
Roll the mixture into small balls, about 1 inch in diameter. Place on a baking sheet lined with parchment paper. -
Step 4
Melt the red and blue candy melts separately according to package directions (microwave or double boiler). Melt Ghirardelli white melting wafers separately. -
Step 5
Dip the Oreo balls into the melted candy melts, ensuring they are fully coated. For a marbled effect, you can dip some in red, some in blue, and drizzle some with white. -
Step 6
While the candy coating is still wet, sprinkle with white star confetti sprinkles. -
Step 7
Place the decorated Oreo balls back on the parchment-lined baking sheet and refrigerate for at least 30 minutes, or until the candy coating is set.
Important Information
Nutrition Facts (Per Serving)
It is important to consider this information as approximate and not to use it as definitive health advice.
Allergy Information
Please check ingredients for potential allergens and consult a health professional if in doubt.