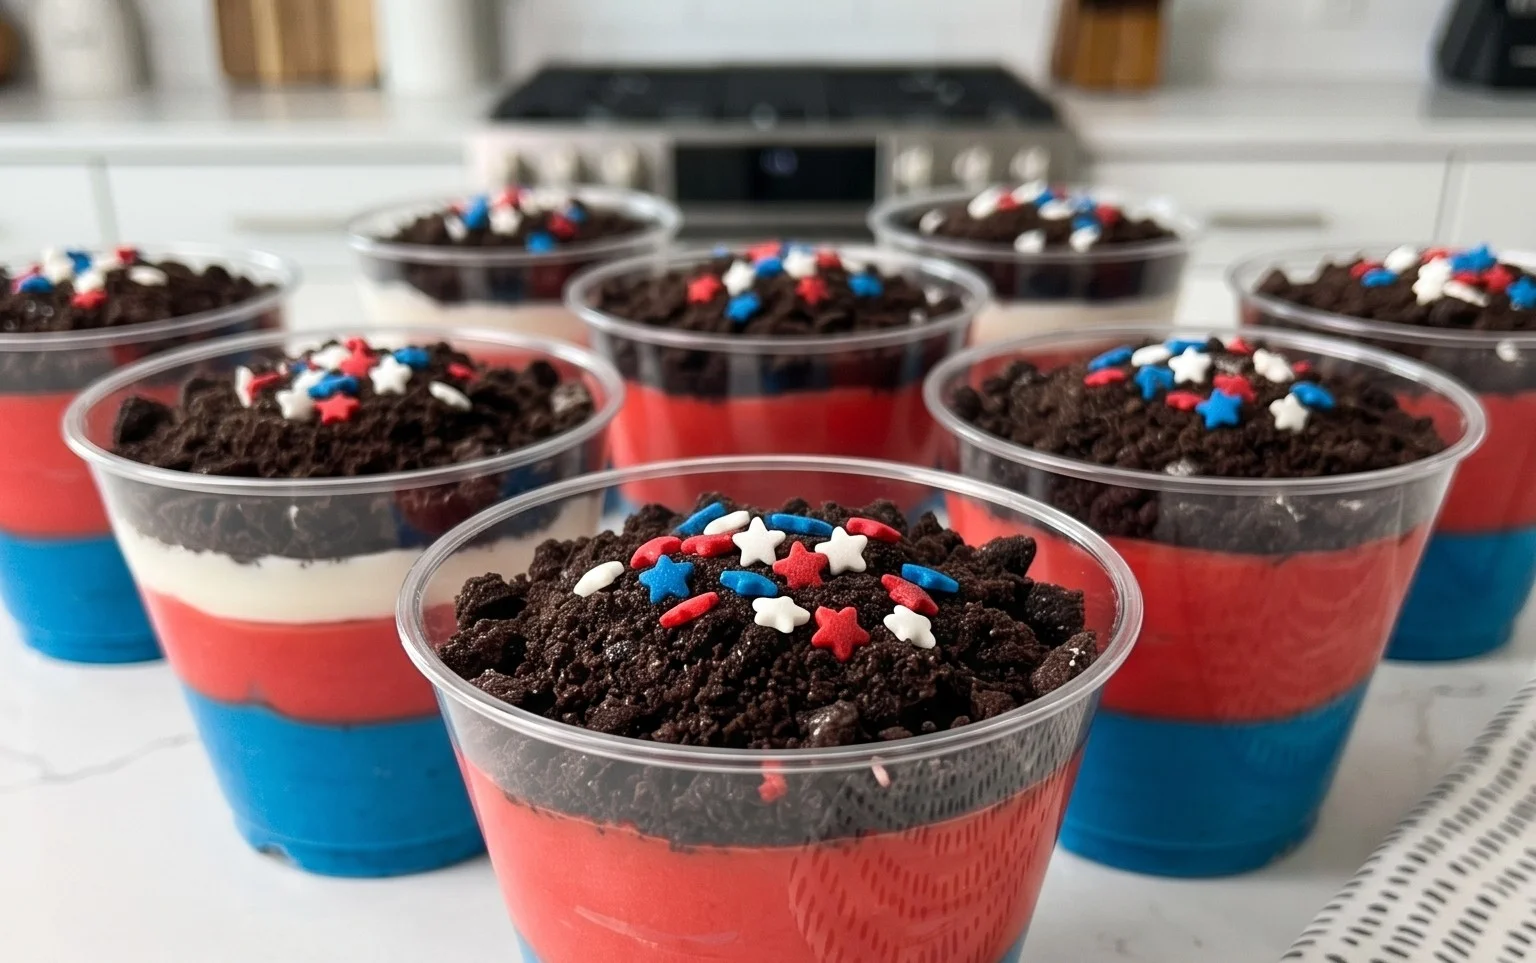
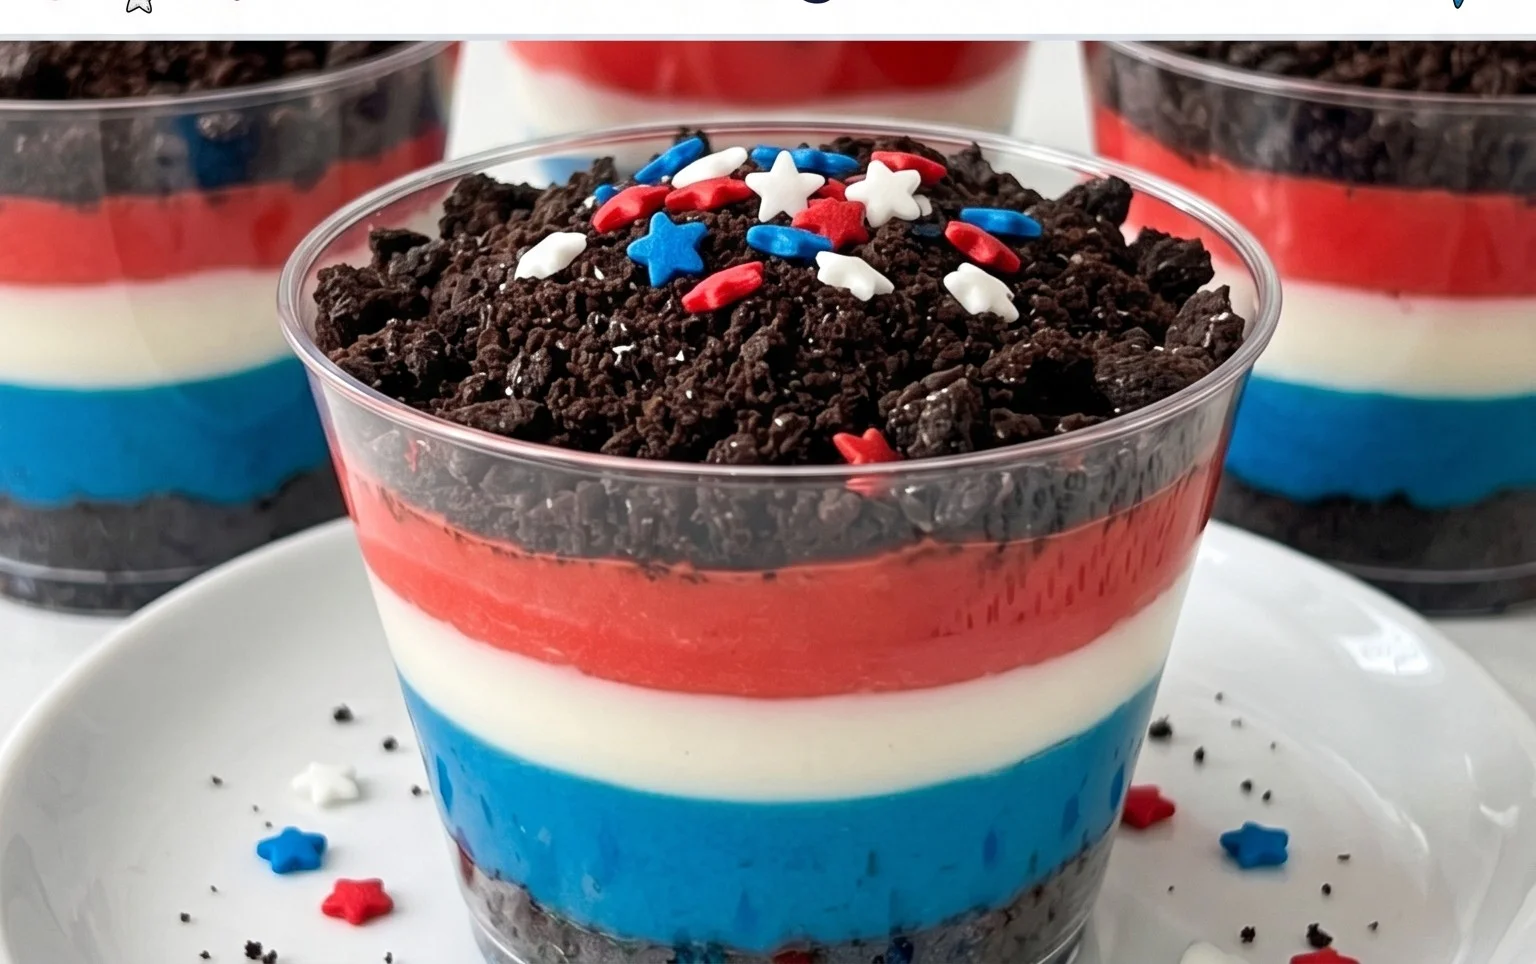
Red White and Blue Dirt Cups Festive Dessert
Red, White and Blue Dirt Cups are the quintessential treat for any patriotic celebration, and for good reason! They’re not just a dessert; they’re a delightful edible landscape that sparks joy in every spoonful. I absolutely adore making these simple yet stunning dirt cups because they capture the spirit of holidays like the Fourth of July and Memorial Day with such playful flair. What makes them so special? It’s the perfect marriage of textures and flavors: the rich, chocolatey “dirt” made from crushed cookies, the creamy, dreamy pudding, and the sweet burst of red and blue berries. These Red, White and Blue Dirt Cups are incredibly easy to assemble, making them a fantastic activity to do with kids, and they always disappear faster than you can say “Yankee Doodle Dandy!” Prepare to impress with this crowd-pleasing, visually appealing, and utterly delicious classic.
Red, White and Blue Dirt Cups
Get ready for a truly patriotic and utterly delicious treat that’s perfect for your next summer picnic, Fourth of July celebration, or just because you’re feeling festive! These Red, White, and Blue Dirt Cups are a playful twist on a classic, transforming simple ingredients into a visually stunning and incredibly satisfying dessert. The “dirt” is made from crushed Oreos, the “worms” are fun gummy treats, and the creamy pudding layers bring it all together with bursts of red and blue. They’re so easy to make, the kids can help, and the results are always a crowd-pleaser. Let’s dive into creating these charming little cups of joy!
Ingredients:
Instructions:
Preparing the Pudding Layers: The Foundation of Flavor
The first step in creating our vibrant dirt cups is to prepare the delicious cheesecake pudding. In a large mixing bowl, combine the contents of both cheesecake pudding boxes. It’s important to use the cheesecake flavor here, as it provides a wonderfully creamy and slightly tangy base that complements the sweetness of the Oreos and gummies perfectly. Now, gradually whisk in the 4 cups of milk. Continue whisking for about 2 minutes, or until the pudding is smooth and well combined. Don’t overmix, but ensure there are no lumps. At this point, the pudding will be a light, creamy color. We’ll divide this base and then infuse it with our patriotic colors. This initial preparation is key to ensuring a smooth and evenly flavored pudding throughout your dirt cups. Let it sit for about 5 minutes to allow it to start thickening.
Coloring the Patriotic Pudding: A Splash of Red and Blue
Now comes the fun part – adding those vibrant red and blue hues! We need to divide the prepared pudding into two separate bowls. In one bowl, add the ¼ teaspoon of red gel food dye. Gel food coloring is preferred over liquid because it provides a more concentrated color without thinning out the pudding too much. Gently fold the red dye into the pudding until you achieve a uniform, bright red color. You might need to use a spatula to scrape the sides and bottom of the bowl to ensure all the dye is incorporated. Rinse your spatula thoroughly, or use a separate one, before moving to the next color. In the second bowl, add the ¼ teaspoon of blue gel food dye. Similarly, fold the blue dye into the pudding until it’s a consistent, vibrant blue. The goal here is to create two distinct, rich colors that will really pop against the chocolate “dirt.”
Creating the “Dirt”: Crushing Our Chocolatey Foundation
While the pudding is chilling and setting up, let’s prepare our “dirt.” Take your 19 Oreo cookies and place them into a sturdy zip-top bag. Seal the bag tightly, pressing out as much air as possible. You can use a rolling pin, the bottom of a heavy glass, or even a mallet to crush the cookies. We want a fine, crum extractbly texture that resembles rich, dark soil. It’s okay to have a few slightly larger chunks for textural interest, but aim for mostly fine crum extractbs. If you prefer a more uniform texture, you can also pulse them in a food processor until they reach the desired consistency. The aroma of crushed Oreos alone is enough to make you excited for these dirt cups! This crushed cookie mixture will be layered throughout our pudding to create that signature “dirt” effect.
Assembling the Red, White, and Blue Layers: Building Our Dessert Landscape
Now it’s time to assemble our dazzling dirt cups! Grab your serving dishes. These can be clear plastic cups, small mason jars, or even grape juice glasses for a more elegant presentation. Start by spooning a layer of the crushed Oreo “dirt” into the bottom of each cup. This forms the base of our edible landscape. Next, add a layer of your red pudding. You can spoon it in carefully or use a piping bag for a cleaner look. Don’t worry about perfection; a slightly rustic look adds to the charm! On top of the red layer, add another layer of crushed Oreo “dirt.” Then, carefully spoon or pipe a layer of the blue pudding. Continue layering in this manner, alternating between the chocolate “dirt” and the colored pudding, until your cups are almost full. Leave enough space at the top for a final flourish. For the classic “dirt cup” look, the final layer should be crushed Oreos.
Adding the Finishing Touches: Worms and Final Presentation
The final, and perhaps most exciting, step is to add the decorative elements that bring these dirt cups to life! Take your 8 red and blue gummy worms. Gently push them into the top layer of crushed Oreo “dirt” so that they look like they’re emergin extractg from the ground. You can have one or two worms peeking out of each cup, or arrange them in a playful, wriggling fashion. The contrasting colors of the gummy worms against the dark chocolate “dirt” and the vibrant pudding layers create a truly eye-catching dessert. Once all the worms are in place, you can place your dirt cups in the refrigerator for at least 30 minutes to allow the pudding to fully set and the flavors to meld. This chilling time also ensures that the layers are firm and hold their shape when served.
Conclusion:
I hope you had as much fun exploring the recipe for these vibrant Red, White and Blue Dirt Cups as I did! These are a fantastic treat because they are incredibly easy to make, require no baking, and offer a delightful combination of textures and flavors. The creamy pudding, crunchy cookies, and sweet fruit create a symphony in your mouth that’s perfect for any occasion. Whether you’re hosting a summer barbecue, celebrating a holiday, or just looking for a fun dessert to whip up with the kids, these dirt cups are sure to be a hit. They’re also wonderfully versatile, allowing for endless customization to suit your preferences.
For serving, these individual dirt cups are perfect as-is. You can also serve them in a larger trifle dish for a communal dessert experience. Don’t be afraid to get creative with variations! You could experiment with different pudding flavors like chocolate, vanilla, or even cheesecake. For added flair, consider using different types of crushed cookies, adding a layer of whipped cream, or topping with gummy worms for an extra touch of “dirt.” I highly encourage you to give this simple yet spectacular Red, White and Blue Dirt Cups recipe a try. It’s a guaranteed crowd-pleaser!
Frequently Asked Questions:
Can I make these ahead of time?
Yes, absolutely! These Red, White and Blue Dirt Cups are perfect for making ahead. You can assemble them up to 24 hours in advance and store them covered in the refrigerator. This makes them a fantastic option for parties and gatherings, as they can be prepared before the event, saving you time on the day.
What kind of pudding works best?
While instant chocolate pudding is the classic choice for a “dirt cup” effect, you can really use any flavor you enjoy! Vanilla, vanilla bean, or even a white chocolate pudding would work beautifully and still allow the red and blue elements to shine. Just be sure to prepare it according to the package directions.
Are there any nut-free options for this recipe?
Yes, there are! If you need a nut-free version, ensure your chocolate sandwich cookies are made in a nut-free facility. Many brands offer such options. You can also opt for a different nut-free cookie that crushes well, like grabeef ham crackers or shortbread cookies, as long as they fit the theme and your dietary needs.
Red, White and Blue Dirt Cups
A festive and easy no-bake dessert perfect for patriotic holidays. Layers of creamy cheesecake pudding, crushed Oreos, and colorful gummy worms create a delightful treat.
Ingredients
-
2 boxes cheesecake pudding (3.4 ounces each)
-
4 cups milk
-
19 Oreo cookies (crushed)
-
¼ teaspoon red gel food dye
-
¼ teaspoon blue gel food dye
-
8 red and blue gummy worms
Instructions
-
Step 1
In a large bowl, whisk together the cheesecake pudding mix and milk until well combined and slightly thickened. Let it sit for 5 minutes. -
Step 2
Divide the pudding into three equal portions in separate bowls. Leave one portion plain (for the white layer). -
Step 3
Add the red gel food dye to one portion of pudding and stir until evenly colored. Add the blue gel food dye to the second portion of pudding and stir until evenly colored. -
Step 4
In a separate bowl, crush the Oreo cookies until they resemble dirt. You can use a food processor or place them in a Ziploc bag and crush them with a rolling pin. -
Step 5
In clear cups or jars, begin layering the dessert. Start with a layer of crushed Oreos, then a layer of white pudding, followed by red pudding, and then blue pudding. Repeat the layers as desired. -
Step 6
Top each cup with more crushed Oreos to create the ‘dirt’ effect. Garnish with red and blue gummy worms sticking out of the top. -
Step 7
Chill the dirt cups in the refrigerator for at least 30 minutes before serving to allow them to set.
Important Information
Nutrition Facts (Per Serving)
It is important to consider this information as approximate and not to use it as definitive health advice.
Allergy Information
Please check ingredients for potential allergens and consult a health professional if in doubt.