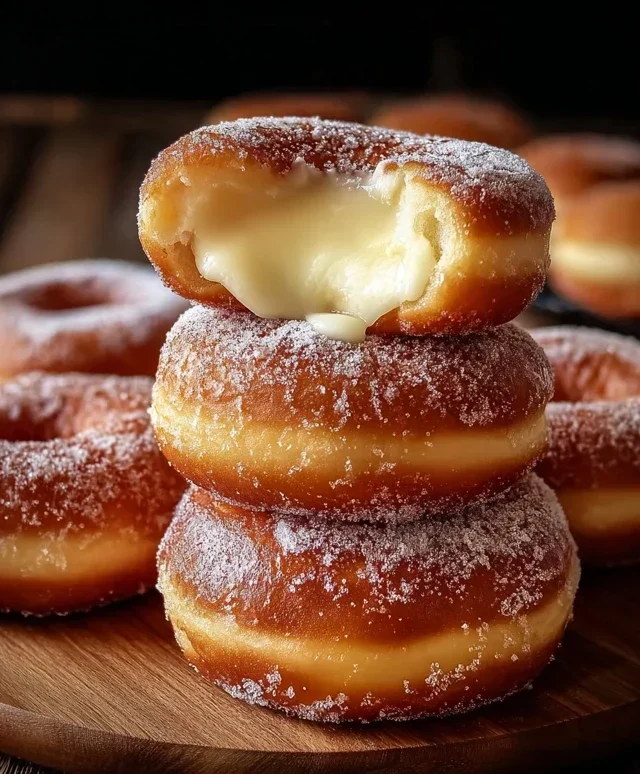
Milky Cheese Donuts- Irresistible Creamy Delight
Milky Cheese Donuts are the undisputed cbeef hampions of my weekend mornings, and for good reason! There’s something utterly magical about the moment you bite into one of these delightful rings. They’re not your average donut; they’re a symphony of textures and flavors that have captured my heart (and stomach) time and time again. The fluffy, cloud-like interior, subtly sweet and infused with a whisper of milky goodness, is perfectly contrasted by the slightly crisp, golden exterior. But the true star? That irresistible, melt-in-your-mouth cheese filling that oozes out with every bite, creating a savory surprise that balances the sweetness beautifully. Forget complicated baking projects; these Milky Cheese Donuts are surprisingly approachable and promise pure, unadulterated joy. If you’re looking for a treat that’s both comforting and wonderfully unique, prepare to fall head over heels.

Milky Cheese Donuts
There’s something undeniably comforting about a warm, freshly fried donut. But what if we told you we could elevate that experience with the subtle, savory delight of cheese? Introducing our Milky Cheese Donuts, a unique twist on a classic that’s surprisingly simple to make and utterly irresistible. The whole milk lends a wonderful tenderness to the dough, while the melted mozzarella infuses each bite with a gentle, milky cheesiness. These aren’t your average sweet donuts; they offer a delightful balance of flavors, perfect for a weekend brunch, an afternoon pick-me-up, or even as a savory appetizer. Get ready to impress yourself and anyone lucky enough to share these with you!
Ingredients:
Cooking Instructions:
Preparing the Dough
The journey to delicious Milky Cheese Donuts begin extracts with activating our yeast. In a large mixing bowl, combine the warm whole milk with the sugar and active dry yeast. Give it a gentle stir and then let it sit undisturbed for about 5-10 minutes. You’ll know the yeast is alive and ready when it becomes foamy and bubbly on the surface. This foamy head is a sign that the yeast is working its magic, preparing to give our donuts that wonderful, airy texture. While the yeast is blooming, melt your butter.
In a separate bowl, whisk together the all-purpose flour and salt. Once the yeast mixture is foamy, add the lightly beaten egg and the melted butter to it. Stir everything together to combine. Gradually add the wet ingredients to the dry ingredients, mixing until a shaggy dough begin extracts to form. Now, it’s time to knead. Turn the dough out onto a lightly floured surface and knead for about 8-10 minutes. You’re looking for a smooth, elastic dough that springs back when gently poked. If the dough is too sticky, add a little more flour, a tablespoon at a time. Conversely, if it’s too dry, add a tiny bit of milk.
First Rise and Incorporating the Cheese
Once you have a beautifully kneaded dough, lightly grease a clean bowl with a touch of oil. Place the dough in the bowl, turning it to coat all sides. Cover the bowl with plastic wrap or a clean kitchen towel and let it rise in a warm place for about 1 to 1.5 hours, or until it has doubled in size. This is where patience pays off, allowing the gluten to develop and the dough to become light and airy.
After the dough has risen, gently punch it down to release the air. Now, for the cheesy goodness! Add the shredded mozzarella cheese to the dough. This might seem unusual, but trust us on this! Knead the dough again for a few minutes, just until the cheese is evenly distributed throughout. You’ll see little streaks of white cheese within the dough. This second kneading helps to redistribute the yeast and ensure the cheese is perfectly incorporated.
Shaping and Second Rise
Now it’s time to shape our donuts. Lightly flour your work surface again. Roll out the dough to about ½ inch thickness. Using a donut cutter or two different-sized round cutters (a larger one for the outer circle and a smaller one for the hole), cut out your donuts. You can also simply cut rounds and then poke a hole in the center with your finger or a smaller cutter. Gather the scraps, gently re-roll them, and cut out more donuts until all the dough is used.
Arrange the cut donuts on a baking sheet lined with parchment paper, making sure to leave some space between them. Cover them loosely with plastic wrap or a kitchen towel and let them rise again for another 30-45 minutes. This second rise is crucial for achieving those signature fluffy donut textures. They should look visibly puffier and more delicate at this stage.
Frying to Perfection
While the donuts are having their second rise, it’s time to prepare for frying. Pour enough vegetable or canola oil into a heavy-bottomed pot or Dutch oven to reach a depth of about 2-3 inches. Heat the oil over medium heat to 350°F (175°C). It’s important to maintain this temperature; too hot and the donuts will burn on the outside before cooking through, too cool and they will absorb too much oil. Use a thermometer to monitor the temperature for best results.
Carefully lower 2-3 donuts at a time into the hot oil, being careful not to overcrowd the pot. Fry for about 1-2 minutes per side, until they are a beautiful golden brown. Use a slotted spoon or spider strainer to gently flip them. Once they are golden brown on both sides, remove them from the oil and place them on a wire rack set over a baking sheet to drain any excess oil. Repeat this process with the remaining donuts.
Finishing Touches
Once all the donuts have been fried and are still warm, you can decide on your finishing touch. For a classic sweet element that wonderfully complements the savory cheese, you can lightly dust them with powdered sugar. This is entirely optional, as the cheese flavor is quite present and enjoyable on its own. If you do opt for the powdered sugar, a light dusting is all you need to add a touch of sweetness without overwhelming the subtle cheesy notes.
Allow the donuts to cool slightly on the wire rack before serving. These Milky Cheese Donuts are best enjoyed fresh, when they are still warm and the mozzarella is delightfully melty. They offer a unique savory-sweet experience that is sure to become a new favorite. Enjoy the delightful surprise of cheese in your donuts!
Conclusion:
I truly hope you’ve enjoyed learning how to make these absolutely delightful Milky Cheese Donuts! This recipe is fantastic because it strikes a perfect balance between sweet and savory, creating a unique and incredibly satisfying treat. The creamy cheese filling, nestled within a tender, slightly sweet donut dough, offers a flavor profile that’s both comforting and exciting. They’re surprisingly easy to whip up, making them a perfect project for a weekend baking session or even a special brunch.
For serving, these Milky Cheese Donuts are divine served warm, perhaps with a light dusting of powdered sugar or a drizzle of honey. They also pair beautifully with a cup of coffee or tea. If you’re feeling adventurous, consider adding a pinch of black pepper to the cheese filling for a subtle kick, or a sprinkle of finely chopped chives for an herbaceous note. The possibilities for personalizing your donuts are endless!
I wholeheartedly encourage you to give this recipe a try. I’m confident you’ll fall in love with their comforting texture and unique taste. Experiment, have fun in the kitchen, and enjoy every delicious bite of your homemade Milky Cheese Donuts!
Frequently Asked Questions:
Can I make these donuts ahead of time?
Yes, you can prepare the dough and the cheese filling separately a day in advance. Store them covered in the refrigerator. For the best results, it’s recommended to fry the donuts on the day you plan to serve them, as they are freshest and most enjoyable when warm.
What kind of cheese is best for the filling?
A mild, creamy cheese works best. Cream cheese is an excellent base, and you can mix it with a bit of shredded mozzarella or cheddar for added flavor and meltiness. Avoid very sharp or crum extractbly cheeses, as they might not blend as smoothly.
My donuts are not puffing up. What could be wrong?
This could be due to a few reasons. Ensure your yeast is fresh and active by proofing it before adding it to the dough. Also, make sure your dough has risen sufficiently in a warm place before shaping and frying. Overworking the dough can also hinder its rise.
Milky Cheese Donuts
Soft and slightly sweet donuts infused with the subtle savory flavor of mozzarella cheese, perfect for a delightful treat.
Ingredients
-
2 cups all-purpose flour
-
1 cup whole milk, warm (about 110°F)
-
2 tablespoons sugar
-
2¼ teaspoons active dry yeast
-
½ teaspoon salt
-
1 large egg
-
4 tablespoons unsalted butter, melted
-
1 cup shredded mozzarella cheese
-
Vegetable oil, for frying
-
Powdered sugar, for dusting (optional)
Instructions
-
Step 1
In a small bowl, combine the warm milk, sugar, and yeast. Let it sit for 5-10 minutes until frothy. -
Step 2
In a large bowl, whisk together the flour and salt. Make a well in the center. -
Step 3
Pour the yeast mixture, egg, and melted butter into the well. Mix until a soft dough forms. Knead for 5-7 minutes until smooth and elastic. -
Step 4
Gently fold in the shredded mozzarella cheese into the dough. Cover the bowl and let it rise in a warm place for about 1 hour, or until doubled in size. -
Step 5
Turn the dough out onto a lightly floured surface. Roll it out to about ½ inch thickness and cut out donut shapes. -
Step 6
Heat about 2 inches of vegetable oil in a deep skillet or pot over medium heat to 350°F (175°C). Carefully fry the donuts for 1-2 minutes per side, until golden brown. -
Step 7
Remove donuts from the oil with a slotted spoon and drain on paper towels. Dust with powdered sugar if desired, while still warm.
Important Information
Nutrition Facts (Per Serving)
It is important to consider this information as approximate and not to use it as definitive health advice.
Allergy Information
Please check ingredients for potential allergens and consult a health professional if in doubt.