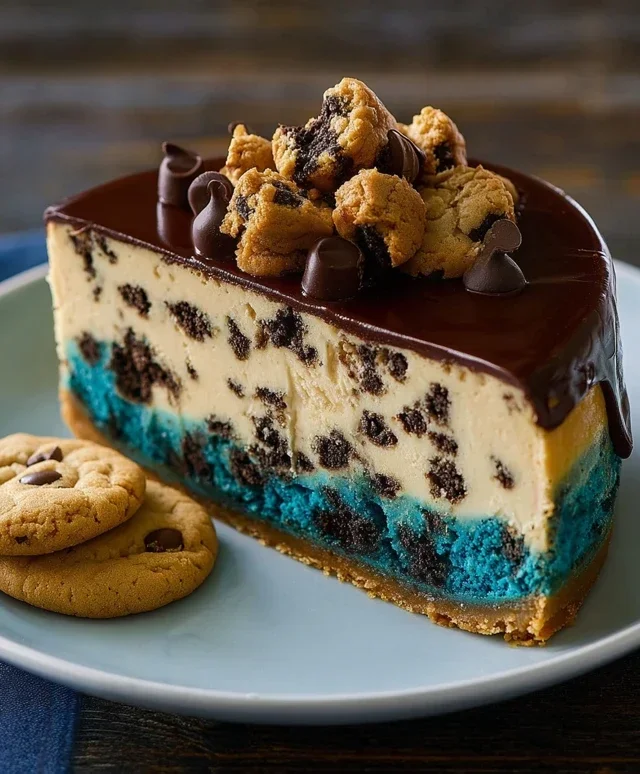
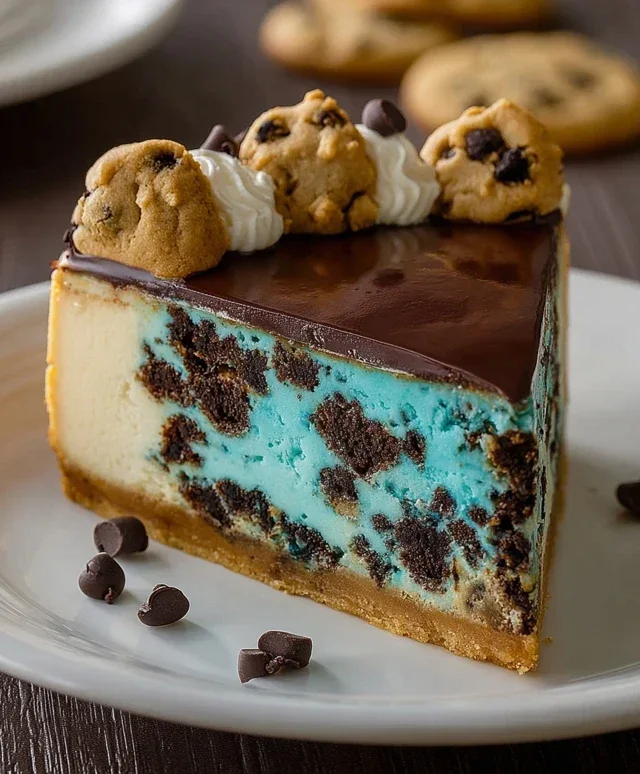
Cookie Monster Cheesecake Recipe- Yummy Blue Treat
Cookie Monster Cheesecake isn’t just a dessert; it’s a vibrant explosion of nostalgic joy and creamy indulgence, a guaranteed crowd-pleaser that taps into everyone’s inner child. Have you ever craved a treat that’s both sophisticated and ridiculously fun? That’s exactly where this Cookie Monster Cheesecake shines. We’re talking about a silky-smooth cheesecake base swirled with chunks of soft, chewy chocolate chip cookies, all topped with a generous scattering of colorful candy and even more cookie goodness. It’s the ultimate fusion of two beloved desserts, creating a symphony of textures and flavors that will have everyone reaching for a second (or third!) slice. This isn’t your average cheesecake; it’s a playful masterpiece designed to bring smiles and happy sighs to any occasion. Prepare yourself for a truly unforgettable dessert experience with this amazing Cookie Monster Cheesecake.
Cookie Monster Cheesecake
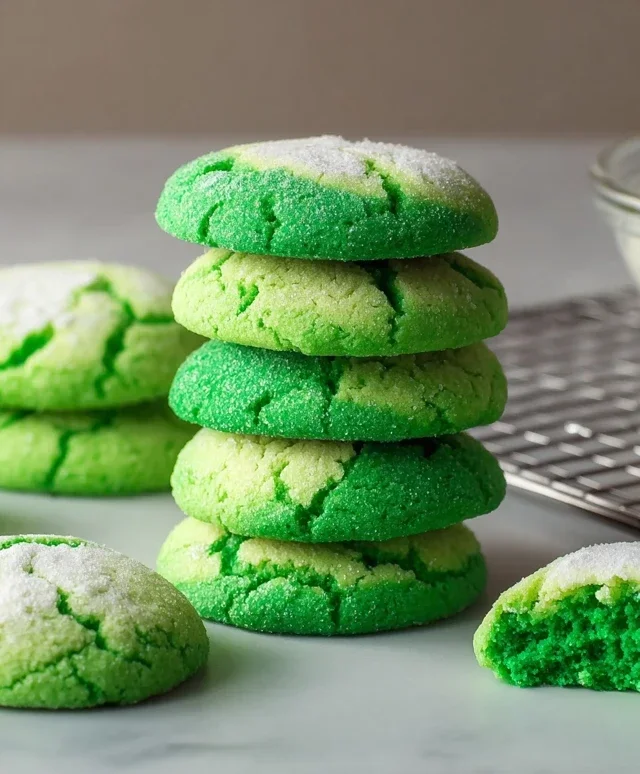
Get ready for a shockingly blue and outrageously delicious treat that’s sure to bring out the inner child in everyone! This Cookie Monster Cheesecake isn’t just a dessert; it’s an experience. Imagin extracte a creamy, decadent cheesecake swirled with vibrant blue hues and studded with chocolate chips, all nestled on a chewy, slightly salty cookie crust. It’s the perfect showstopper for birthdays, holidays, or just when you need a serious dose of fun and flavor. We’re going to channel our favorite fuzzy blue monster and make something truly spectacular. Don’t be intimidated by cheesecake; with these detailed instructions, you’ll be a cheesecake pro in no time.
Ingredients:
Instructions:
Step 1: Crafting the Cookie Crust
First, we’re going to build the foundation of our Cookie Monster masterpiece – a delightful cookie crust. In a medium bowl, combine the softened 4 oz of unsalted butter with 1/2 tsp of salt and the 2.6 oz of tightly packed brown sugar. Cream these together using a hand mixer or a sturdy whisk until the mixture is light and fluffy. This is where we start building those delicious flavors. Next, add the 1 egg and 1 tsp of vanilla extract. Mix until everything is well incorporated and the mixture is smooth. Now, gradually add the 4.4 oz of all-purpose flour, mixing just until combined. Be careful not to overmix at this stage; we want a tender crust. Finally, gently fold in the 4 oz of semisweet mini chocolate chips. The dough will be a bit sticky, which is perfectly fine. Press this delightful cookie dough evenly into the bottom of a 9-inch springform pan. Make sure to go up the sides just a little bit to create a nice edge for our cheesecake. This crust will bake up beautifully, providing a chewy, slightly salty contrast to the rich cheesecake filling.
Step 2: Preparing the Creamy Cheesecake Filling
Now, let’s move on to the star of the show – the cheesecake filling! In a large bowl, beat the 16 oz of softened cream cheese until it’s incredibly smooth and creamy. This is a crucial step to avoid any lumps. Make sure your cream cheese is truly at room temperature; it makes a world of difference. Once smooth, add the 2 tsp of cornflour and the 3.5 oz of granulated sugar, along with a pinch of salt. Beat again until everything is just combined and you have a silky-smooth mixture. In a separate, smaller bowl, whisk together the 1/2 cup of cold whipping cream with 1 tsp of vanilla extract. This will help add richness and a lovely texture. Gradually add this cream mixture to the cream cheese mixture, mixing on low speed until just incorporated.
Step 3: The Fun Part – Coloring and Incorporating Eggs
This is where our cheesecake truly earns its Cookie Monster name! We’re going to introduce that signature vibrant blue. Add your blue gel food coloring to the cheesecake batter. Start with a few drops and mix thoroughly. Gel food coloring is best because it provides intense color without adding too much liquid. Keep adding color until you achieve a wonderfully bright, cheerful blue hue that reminds you of our favorite monster. Now, it’s time to add the 3 eggs, one at a time, mixing on low speed after each addition until just incorporated. Don’t overmix once the eggs are added, as this can introduce too much air, which can lead to cracks in your cheesecake. Scrape down the sides of the bowl as needed to ensure everything is thoroughly blended.
Step 4: Assembling and Baking the Cheesecake
Pour about half of the blue cheesecake batter over the cookie crust in your prepared springform pan. Then, dollop spoonfuls of the remaining batter on top of the first half. You can use a skewer or a toothpick to gently swirl the colors together for a marbled effect, but don’t overdo it – we still want distinct patches of blue. Alternatively, you can simply pour the rest of the batter on top and let the chocolate chips create their own delightful pockets of texture.
Preheat your oven to 325°F (160°C). It’s time to bake! For a perfectly creamy cheesecake, we’ll use a water bath. Wrap the outside of your springform pan tightly with heavy-duty aluminum foil, ensuring no water can seep in. Place the foil-wrapped pan into a larger baking pan (like a roasting pan). Carefully pour hot water into the larger baking pan until it comes about halfway up the sides of the springform pan. This water bath helps to create a moist, even baking environment, preventing the cheesecake from drying out and cracking. Bake for approximately 50-60 minutes, or until the edges are set but the center is still slightly jiggly.
Step 5: Cooling and Chilling for Perfection
Once baked, carefully remove the springform pan from the water bath. Let the cheesecake cool on a wire rack for about 1 hour. Don’t be tempted to remove it from the pan yet! This gradual cooling process is crucial for preventing cracks. After the initial cooling, cover the cheesecake loosely with plastic wrap and refrigerate for at least 6 hours, or preferably overnight. This chilling period is essential for the cheesecake to set fully and for the flavors to meld beautifully. When you’re ready to serve, carefully run a thin knife around the edge of the pan before releasing the springform clasp. Slice and enjoy this wonderfully whimsical and incredibly delicious Cookie Monster Cheesecake! You can even garnish with extra chocolate chips or a dollop of whipped cream for an extra touch of fun.
Conclusion:
And there you have it – a recipe for the most delightfully blue and utterly delicious Cookie Monster Cheesecake! This dessert is an absolute showstopper, guaranteed to bring smiles to faces of all ages. Its creamy, rich cheesecake filling studded with chunks of chocolate chip cookies and topped with that iconic blue swirl and cookie crum extractbles makes it incredibly fun and visually appealing. It’s the perfect centerpiece for birthdays, holidays, or simply as a treat to brighten your day. I truly encourage you to give this Cookie Monster Cheesecake a try; you won’t regret the explosion of flavor and fun!
For serving suggestions, I find it’s best enjoyed slightly chilled, allowing the textures to meld perfectly. A dollop of whipped cream and a few extra cookie crum extractbles on top elevate it even further. If you’re feeling adventurous with variations, consider adding a layer of crushed Oreos to the crust for an extra chocolatey punch, or perhaps swirling in some mini M&Ms for added color and crunch.
Frequently Asked Questions about Cookie Monster Cheesecake:
Can I make this cheesecake ahead of time?
Absolutely! Cheesecakes are fantastic for making ahead. I usually bake mine a day in advance and let it chill overnight in the refrigerator. This allows the flavors to deepen and the texture to set beautifully, making it easier to slice and serve.
What kind of blue food coloring should I use?
For the most vibrant and consistent blue color, I recommend using a gel food coloring. A little goes a long way, so start with a small amount and add more gradually until you achieve your desired shade of Cookie Monster blue. Liquid food coloring can sometimes alter the consistency of the batter.
Is it difficult to achieve the swirled effect?
Not at all! The blue swirl is part of the fun and doesn’t require any special skills. Simply drop spoonfuls of the blue-tinted cheesecake batter onto the plain batter and then use a toothpick or a knife to gently swirl them together. Don’t overmix, you want distinct swirls!
Cookie Monster Cheesecake
A vibrant and delicious cheesecake inspired by the beloved Cookie Monster, featuring a chocolate chip cookie crust and creamy blue cheesecake filling.
Ingredients
-
4 oz unsalted butter, melted
-
1/2 tsp salt
-
2.6 oz brown sugar, tightly packed
-
1 egg
-
1 tsp vanilla extract
-
4.4 oz all-purpose flour
-
4 oz semisweet mini chocolate chips
-
16 oz cream cheese, softened
-
2 tsp cornflour
-
3.5 oz granulated sugar
-
Pinch of salt
-
1/2 cup whipping cream
-
Blue gel food coloring
-
1 tsp vanilla extract
-
3 eggs
Instructions
-
Step 1
For the crust: Combine melted butter, brown sugar, salt, egg, 1 tsp vanilla extract, flour, and chocolate chips. Press into the bottom of a greased springform pan. -
Step 2
Bake the crust at 350°F (175°C) for 10-12 minutes. Let cool. -
Step 3
For the filling: Beat cream cheese until smooth. Add granulated sugar, cornflour, salt, 1 tsp vanilla extract, and 3 eggs, one at a time, beating well after each addition. -
Step 4
Stir in whipping cream and blue gel food coloring until desired color is achieved. -
Step 5
Pour the filling over the cooled crust. -
Step 6
Bake at 325°F (160°C) for 50-60 minutes, or until the center is almost set. -
Step 7
Turn off the oven and let the cheesecake cool in the oven with the door ajar for 1 hour. Then, cool completely at room temperature before refrigerating for at least 4 hours or overnight.
Important Information
Nutrition Facts (Per Serving)
It is important to consider this information as approximate and not to use it as definitive health advice.
Allergy Information
Please check ingredients for potential allergens and consult a health professional if in doubt.