Easy St Patrick’s Day Cookies – Quick Green Treats
Easy St. Patrick’s Day Cookies are the ultimate shortcut to festive fun without any kitchen stress! As the emerald glow of St. Paddy’s Day approaches, we all crave a touch of that celebratory spirit, and what better way to capture it than with a batch of delightful, green-hued treats? These aren’t just any cookies; they’re little bites of pure joy, perfect for sharing with friends, family, or even for leaving out for a leprechaun. The magic of these easy St. Patrick’s Day cookies lies in their simplicity. You don’t need to be a baking expert to whip up a batch that looks and tastes like you spent hours crafting them. Their vibrant color is instantly uplifting, and the sweet, comforting flavor is a guaranteed crowd-pleaser. Get ready to make your St. Patrick’s Day celebrations a little sweeter and a lot more delicious with these wonderfully simple cookies.
Easy St. Patrick’s Day Cookies
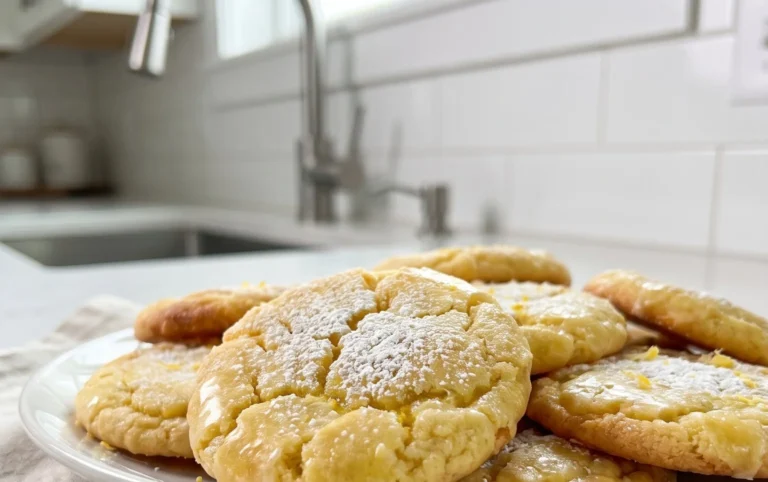
St. Patrick’s Day is the perfect excuse to get a little festive in the kitchen, and what better way to celebrate than with some cheerful, green cookies? These Easy St. Patrick’s Day Cookies are so simple to make, you’ll have a whole batch of emerald-hued goodness ready in no time. They’re perfect for a last-minute party treat, a fun activity with the kids, or just to brighten up your day. The secret to their ease? We’re using a cake mix as our base, which gives us a tender, delicious cookie with minimal effort. No complicated creaming or sifting required here!
The vibrant green color instantly screams St. Patrick’s Day, making them an instant hit. Plus, the subtle sweetness from the cake mix and the delicate crispness from the sugar coating make them incredibly addictive. Let’s gather our ingredients and get baking!
Ingredients:
Prepping for Green Goodness
Before we dive into mixing, make sure your ingredients are at room temperature. This helps everything combine smoothly and creates a more consistent dough. I like to preheat my oven to 350°F (175°C) and line my baking sheets with parchment paper. This not only prevents sticking but also makes clean-up a breeze, which is always a win in my book! Parchment paper is a game-changer for cookies, ensuring they don’t spread too much and get that perfect golden-brown edge.
Creating the Dough
1. In a large mixing bowl, combine the contents of your white cake mix. Then, crack in your two large eggs. Pour in the 1/3 cup of vegetable oil. Now, it’s time to bring on the green! Add your 1/4 teaspoon of Kelly green gel food coloring. Gel food coloring is fantastic because it’s highly concentrated, meaning you get a really vibrant color without adding too much liquid to your dough, which could affect the texture. Start with the recommended amount, and if you want an even deeper, more intense green, you can add just a tiny bit more, drop by drop, until you achieve your desired shade of emerald.
2. Using an electric mixer (a stand mixer with a paddle attachment or a hand mixer), begin extract mixing the ingredients on low speed. Gradually increase the speed to medium and continue mixing until everything is just combined and the dough starts to come together. Be careful not to overmix at this stage; overmixing can lead to tough cookies. You want a soft, slightly sticky dough that’s uniformly green. It should look like a beautiful emerald-green cloud! Scrape down the sides of the bowl a couple of times to ensure all the dry bits from the cake mix are incorporated.
Shaping and Rolling
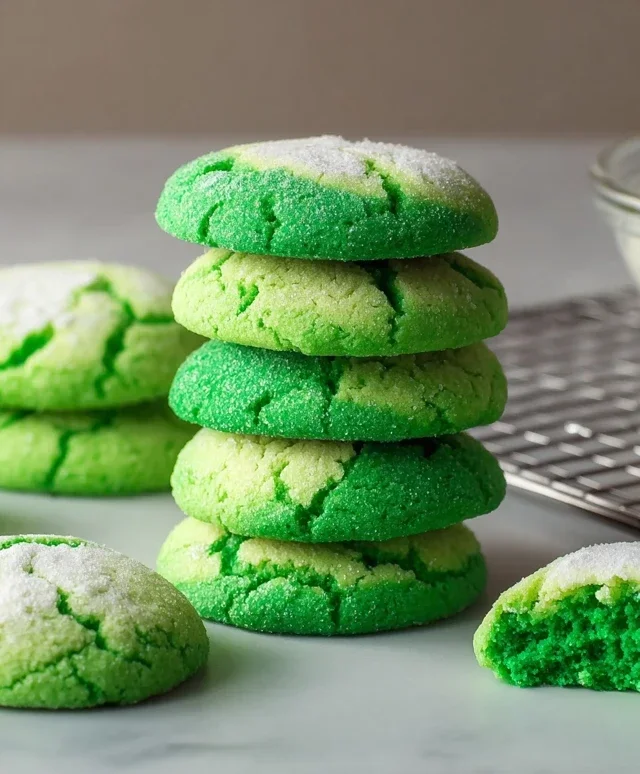
3. Now, let’s get these cookies ready for their sugary embrace. Place the 3 tablespoons of granulated sugar in one shallow bowl or plate. In another shallow bowl or plate, place the 6 tablespoons of powdered sugar. You’ll be rolling your cookie dough balls first in granulated sugar, then in powdered sugar. This creates a delightful textural contrast – a slight crunch from the granulated sugar followed by a soft, melt-in-your-mouth coating from the powdered sugar. Take about one tablespoon of dough and roll it into a smooth ball between your palms. If the dough is too sticky to handle, you can lightly dust your hands with a little bit of flour, but try to avoid adding too much to the dough itself.
4. Once you have your dough ball, gently roll it first in the granulated sugar, coating all sides. Then, carefully roll it in the powdered sugar. You want a good, even coating of both sugars. The powdered sugar coating will give the cookies their distinctive, slightly craggy appearance after baking, which I think is quite charming. Place the sugar-coated balls about 2 inches apart on your prepared baking sheets. This gives them enough space to spread slightly without touching each other as they bake.
Baking and Cooling
5. Pop your baking sheets into the preheated oven. Bake for 9-12 minutes, or until the edges are lightly golden and the centers are set. The exact baking time will depend on your oven and the size of your cookies. Keep a close eye on them, especially during the last few minutes, as they can go from perfectly baked to overdone quite quickly. You want them to look slightly puffed and firm to the touch. Once they’re done, remove the baking sheets from the oven and let the cookies cool on the baking sheets for about 5 minutes. This allows them to firm up enough to be moved without falling apart.
After the initial cooling period on the baking sheets, carefully transfer the cookies to a wire rack to cool completely. This step is crucial for achieving the right texture. Cooling them completely on a wire rack allows air to circulate around them, preventing them from becoming soggy on the bottom. Once they’ve reached room temperature, these Easy St. Patrick’s Day Cookies are ready to be devoured. They are best enjoyed within a few days and can be stored in an airtight container at room temperature. You can also freeze them for longer storage; just make sure they are completely cooled before freezing. Enjoy your festive green treats!
Conclusion:
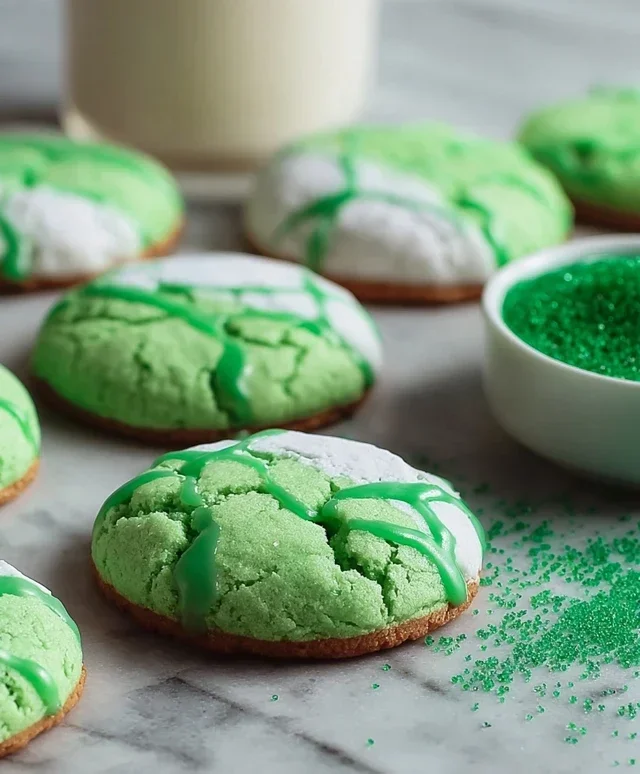
There you have it – a delightfully simple and incredibly festive recipe for Easy St. Patrick’s Day Cookies! These cookies are a fantastic way to bring a bit of St. Patrick’s Day cheer into your kitchen without any fuss. Their buttery, sweet flavor and customizable green decorations make them a guaranteed hit with both kids and adults. The beauty of this recipe lies in its adaptability, allowing you to create unique treats for your celebration.
These cookies are perfect served alongside a warm cup of tea or coffee, or as a fun addition to a St. Patrick’s Day dessert table. They also make wonderful edible gifts for friends and family. Don’t be afraid to get creative with your decorating! You can use edible glitter, green sprinkles, or even pipe on sbeef hamrock designs for an extra special touch. I highly encourage you to give these Easy St. Patrick’s Day Cookies a try – they’re sure to become a new holiday favorite!
Frequently Asked Questions:
Can I make these cookies ahead of time?
Absolutely! These cookies can be baked and stored in an airtight container at room temperature for up to 3-4 days. If you decorate them with frosting, it’s best to let the frosting set completely before stacking them.
What other colors can I use for the dough?
While green is perfect for St. Patrick’s Day, this recipe is wonderfully versatile! You can use other food coloring to create cookies for any holiday or occasion. Try red and pink for Vnon-alcoholic alentine’s Day, or pastel colors for Easter.
How can I make the cookies dairy-free?
To make these cookies dairy-free, you can substitute the butter with a plant-based butter alternative and use a non-dairy milk. Ensure your sprinkles and any other additions are also dairy-free.
Easy St. Patrick’s Day Cookies
Simple and festive green cookies perfect for St. Patrick’s Day celebrations, made with a cake mix base.
Ingredients
-
1 box (15.25 oz) white cake mix (about 3 cups)
-
2 large eggs
-
1/3 cup vegetable oil
-
1/4 teaspoon Kelly green gel food coloring
-
3 tablespoons granulated sugar
-
6 tablespoons powdered sugar
Instructions
-
Step 1
Preheat your oven to 350°F (175°C). Line baking sheets with parchment paper. -
Step 2
In a large bowl, combine the white cake mix, eggs, and vegetable oil. Mix until just combined. -
Step 3
Add the Kelly green gel food coloring and mix until the dough is evenly colored. -
Step 4
Roll the dough into 1-inch balls and then gently roll each ball in the granulated sugar. -
Step 5
Place the balls onto the prepared baking sheets, about 2 inches apart. -
Step 6
Bake for 8-10 minutes, or until the edges are lightly golden and the centers are set. -
Step 7
Let the cookies cool on the baking sheets for a few minutes before transferring them to a wire rack to cool completely. Once cooled, dust with powdered sugar.
Important Information
Nutrition Facts (Per Serving)
It is important to consider this information as approximate and not to use it as definitive health advice.
Allergy Information
Please check ingredients for potential allergens and consult a health professional if in doubt.